
Crusty French Bread Rolls are the perfect bread to serve on weekends and holidays because they’re incredibly easy to make! Try them today!
Homemade Bread doesn’t have to be intimidating! I’ve got a large collection with a variety of yeast bread recipes from these crusty french rolls to Italian Bread to Garlic Herb Dinner Rolls and more!
Sabrina’s Crusty French Bread Rolls
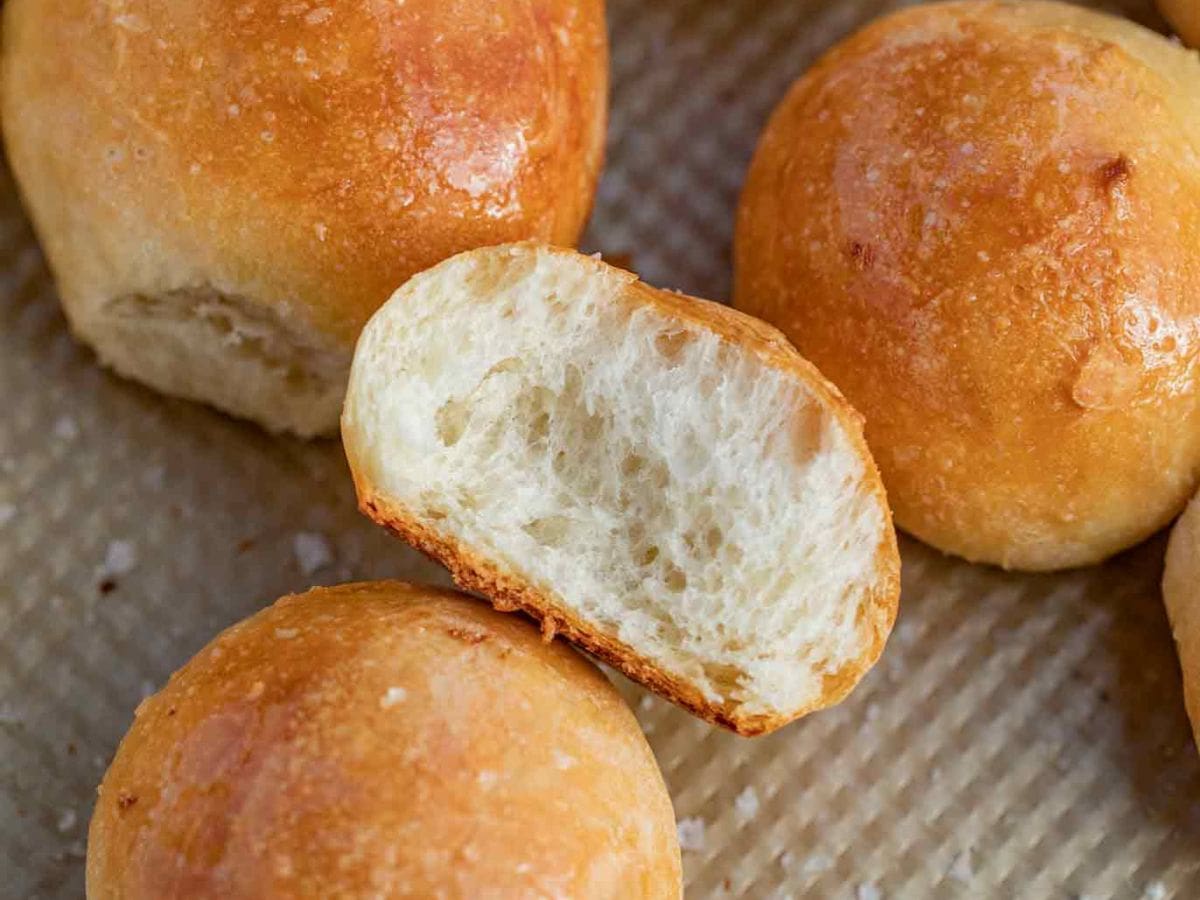
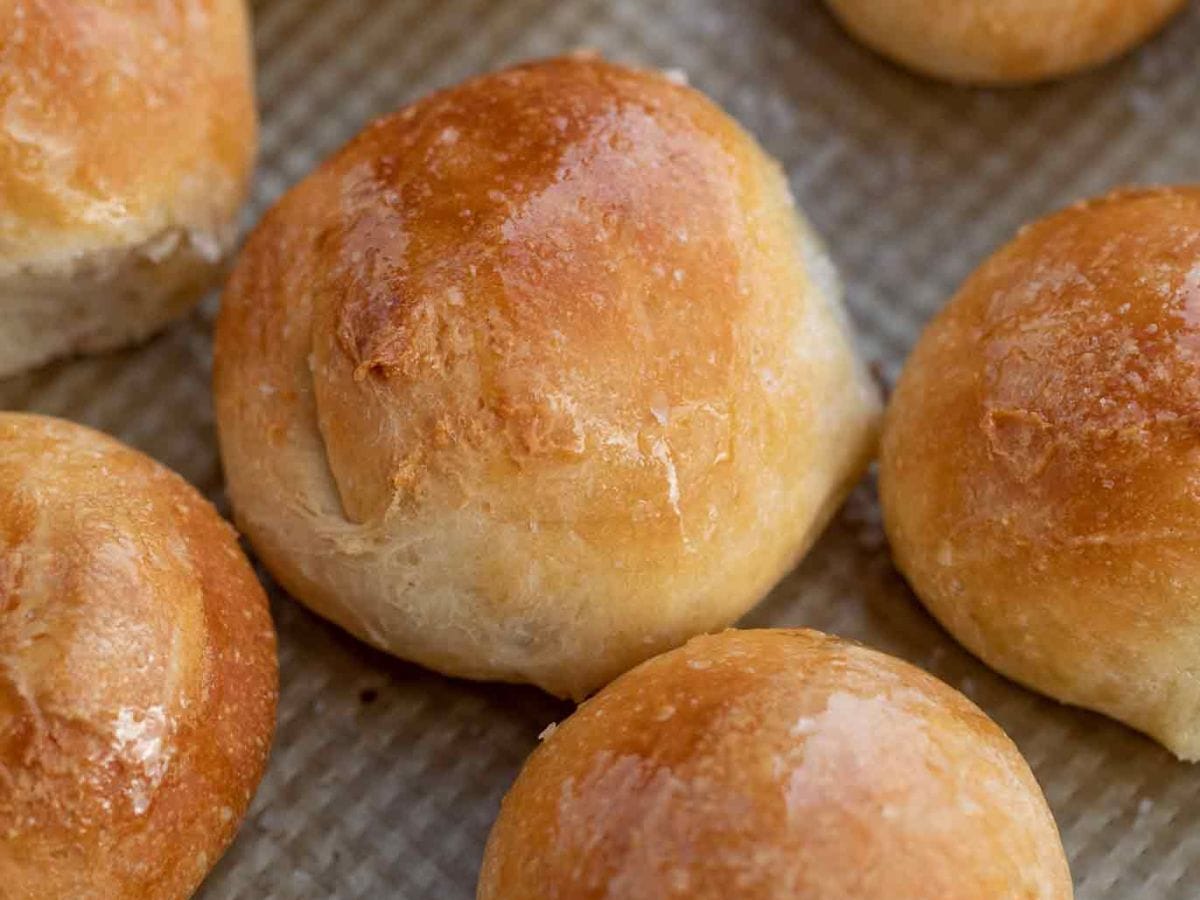
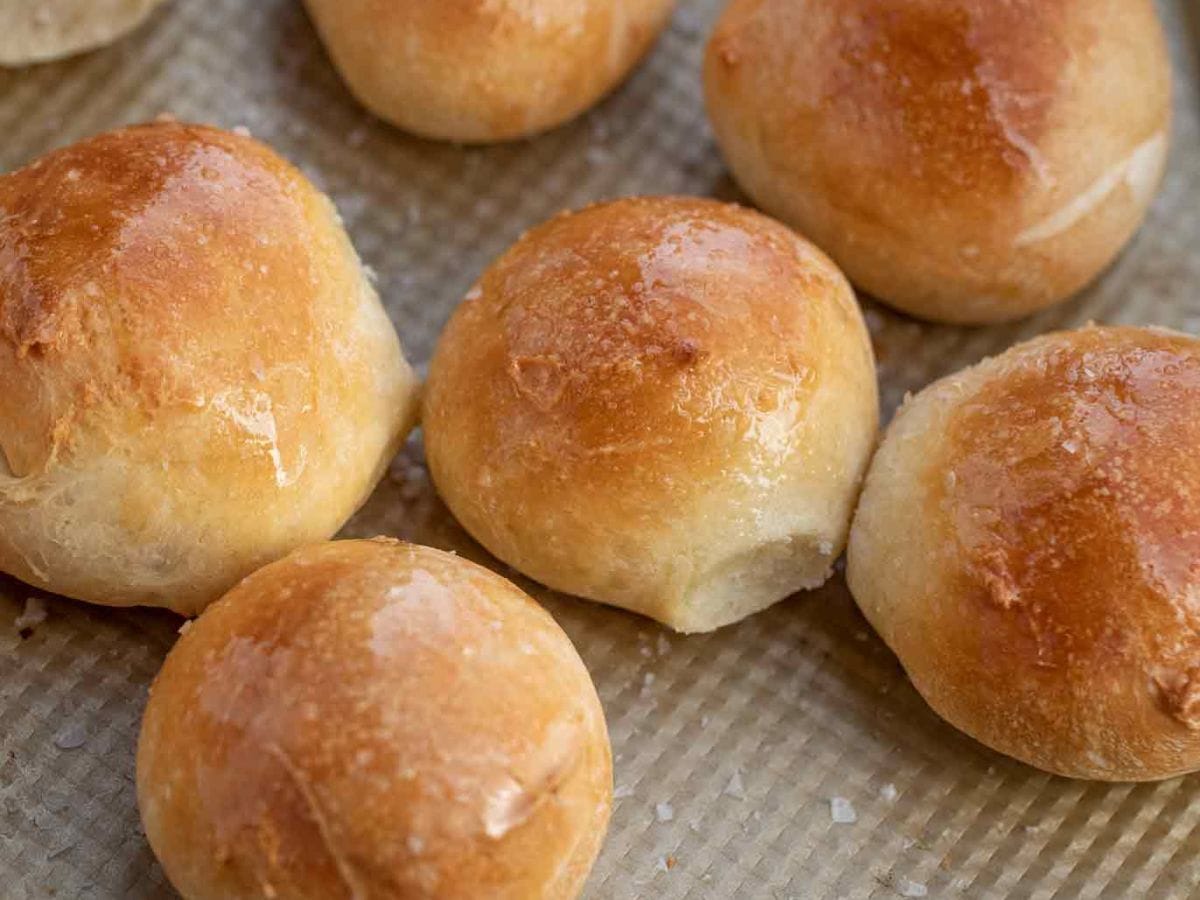
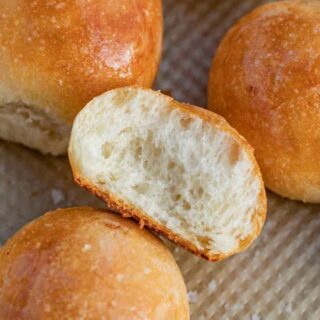
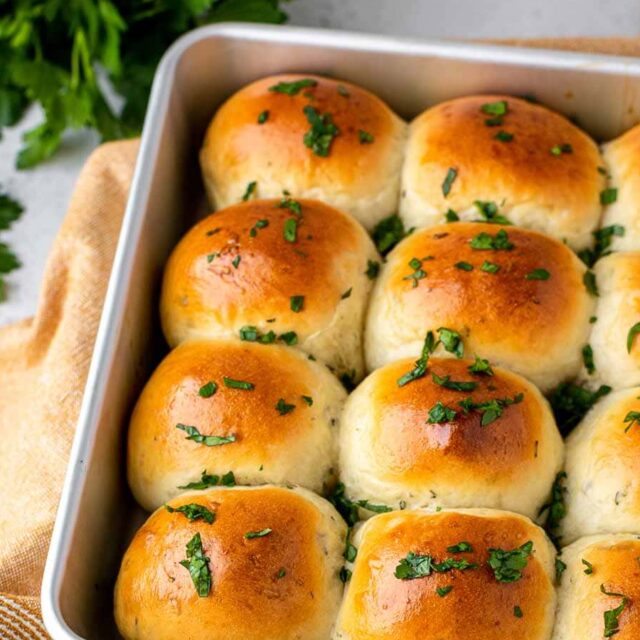
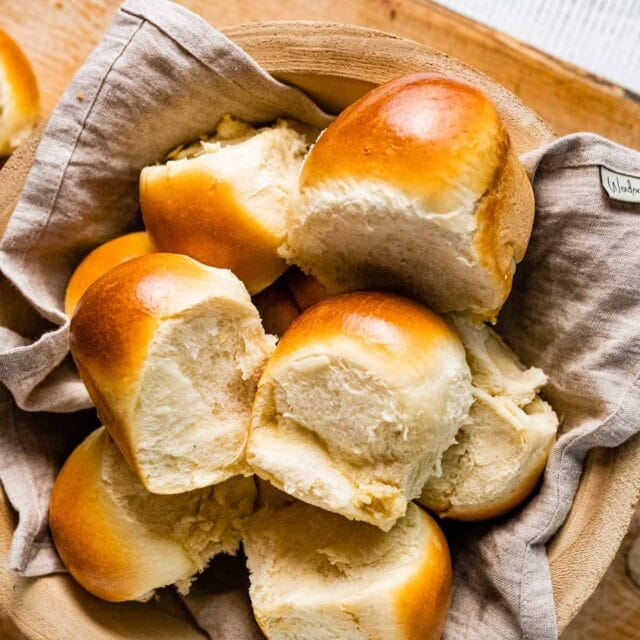
These French Bread Rolls are a favorite side that can go with any dinner. They’re soft and fluffy on the inside and crusty on the outside like a baguette. This is one of my go-to roll recipes because they’re incredibly easy – you don’t even have to knead it by hand if you have a stand mixer! I’ve also included a bread machine variation plus lots of baking tips so any home chef can master these delicious, easy rolls!
Recipe Card
Ingredients
- 1 1/2 cups warm water , (110 degrees)
- 3 teaspoons active dry yeast
- 2 tablespoons sugar
- 2 tablespoons vegetable oil
- 2 teaspoons kosher salt , divided
- 3 1/2 cups flour , up to 4 cups as needed
- 2 tablespoons unsalted butter , melted
- spray bottle with ice water
Instructions
- To a stand mixer add the warm water, yeast and sugar and let sit for 10 minutes until cloudy.
- Add the oil, half the salt and 2 cups of the flour with the dough hook and let it combine on medium speed adding the remaining flour in ¼ cup increments until the dough starts to come together and eventually starts to pull away from the bowl, then turn up the speed and let it knead for 5 minutes.
- Add dough to an oiled bowl and turn in the bowl to coat the dough with oil then cover with a damp towel and let rise in a warm spot until it doubles in size for 60 minutes.
- Divide the dough into 16 balls, place on a greased baking sheet and let rise for an additional 30 minutes.
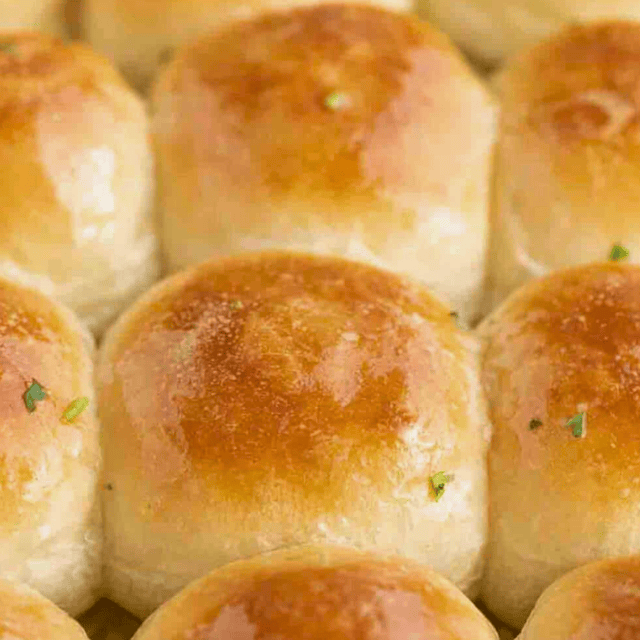
- Brush gently with butter and sprinkle with remaining salt before baking at 400 degrees for 18-20 minutes spraying the dough with ice water twice halfway through the baking process to make the crust chewier.
Notes
- This dough is stickier than most bread dough, however the more you knead it, the more it will come together.
- If it isn’t pulling from the sides or seems too wet, mix in additional flour, 1-2 tablespoons at time, up to ½ cup of flour.
- This recipe was made using the US measuring system and works with the exact US measurements listed. The Metric Conversions on each recipe card are automatically generated and are not chef tested for this recipe.
Nutrition
Want to save this recipe? Create a free account to easily save your favorite recipes
Sabrina’s Note
My easy-to-make rolls are a family favorite and loved by many home chefs who have been following my recipe site for years. My hack is to add an ice water spray halfway through to create steam which results in the crispiest crust. It’s a great side for any dinner during the week and good enough for special events. Hope you enjoy this recipe as much as my readers and I do!
Table of contents
Ingredients
- Warm Water: Activates the yeast to raise the dough. For best results, make sure the water is about 110 degrees, which is on the hotter side but not close to boiling.
- Active Dry Yeast: This is the leavening that makes the bread nice and fluffy. Instant yeast can be used too. You can mix it directly in with the dry ingredients without proofing, but this is not recommended unless using a bread machine.
- Sugar: Feeds the yeast which creates air. Sugar also adds a slight touch of delectable sweetness to the bread.
- Vegetable Oil: This helps the final texture to be soft and delicious. Olive oil can be used if desired.
- Kosher Salt: Salt helps to enhance the flavor.
- Flour: You can use bread flour for a chewier texture, but I’m using regular all-purpose flour for my recipe.
- Unsalted Butter: The melted butter adds the signature golden crust we’re looking for in the recipe.
- Spray Bottle With Ice Water: This is the secret ingredient that creates steam in the oven and gives the rolls that crispy, chewy crust!
Can These Be Made Ahead?
Yes. These are great to make a day in advance, even though fresh-baked bread is always better! But you can freeze the dough ahead of time to make it easier to bake the day of. Divide the uncooked dough into balls, place them on a baking sheet, and freeze. Once they’re frozen, about an hour, you can move them to a plastic bag. When you’re ready to bake, place them back on the baking sheet and bake according to the recipe, spraying with cold water to make them extra crusty (make sure it’s cold; warm water won’t work as well).
Baking Tips
- Make sure to set a timer and let the yeast and sugar sit in the hot water for the full time for the yeast to activate. The water will look cloudy and slightly foamy when it’s ready to use.
- When you’re letting the dough rise, the yeast needs a warm environment to grow. I usually put it near a window, or if your oven is on for another recipe you can keep it on top of the stove.
- Make sure your yeast is as fresh as possible for this bread recipe. If the packet has expired, I recommend not using it, because your dough might not rise correctly.
- Be careful not to knead the dough for longer than the suggested 5 minutes. Kneading the dough for too long can result in dense rolls.
- We’re using the stand mixer for this bread recipe, but you can knead it by hand if you want to.
- You can use this same recipe to make an actual loaf or baguette, either freeform or in a special pan. Or roll them very thin and make breadsticks!
- Wrap these dinner rolls in tinfoil after they’re done baking, to keep them warm until you’re ready to serve.
- Line your baking sheet with parchment paper to help keep the French bread from sticking.
- If the dough is sticking to your hands while you’re trying to work with it, dust your hands with flour lightly.
- Brush the baguette dough with egg wash, or with butter to make the outside golden brown. You can also use a sharp knife to slice down the middle top of the roll for presentation.
How to Store
- Store: These bread rolls will last at room temperature for 4-5 days, wrapped tightly. You can also store them in an airtight container to keep them soft.
- Reheating Tips: Heat leftover rolls in the oven wrapped in tinfoil at 200 degrees to make them seem fresh-baked again before serving.
- Freezing: French bread rolls can be frozen either before or after they’ve been cooked. For cooked bread, freeze the rolls in a sealable plastic bag wrapped in tinfoil. Defrost at room temperature for a few hours before serving, or reheat in the oven to make them soft and crusty again.
Bread Machine Method
- Add Ingredients: Place warm water, yeast, sugar, oil, salt, and flour into the bread machine pan in the order recommended by the bread machine manufacturer.
- Select Settings: Choose the dough cycle and start the machine. The machine will mix, knead, and allow the dough to rise.
- Shape and Bake: Once the dough cycle is complete, remove the dough and follow the recipe here. You’ll divide it into 16 balls, place them on a greased baking sheet, let them rise again for 30 minutes, and then bake in a preheated oven at 400 degrees for 18-20 minutes, spraying with ice water twice halfway through baking.
Frequent Questions
If your roll recipe turns out too hard, it’s possible that you’re overcooking the rolls. Set a timer, and use an oven thermometer to make sure the oven is cooking at the right temperature.
Some French bread recipes call for bread flour because bread flour contains more protein. But I find that all-purpose flour works fine instead of bread flour for this French bread recipe. You can also use whole wheat or other wheat flour for a healthier version.
Variations
- Herb-Infused Rolls: Add 1 tablespoon of dried herbs (like rosemary, thyme, or oregano, or an Italian mix) to the flour at the second step. You’ll get a mouthwatering flavor to add to the aroma of fresh bread! You could also serve the rolls with Garlic Herb Butter.
- Cheese Rolls: Add 1 cup of shredded cheese (your choice between cheddar, parmesan, or asiago) into the dough during the mixing stage.
More Homemade Bread Roll Recipes


Photos used in previous versions of this post.


To freeze these rolls, do you let them rise first, or freeze as soon as the balls are rolled?
How long do they need to defrost before baking?
Thanks
Yes, freeze them after you’ve shaped them. I usually let it thaw overnight in the fridge before baking. Enjoy!
This recipe is wonderful! However, I would suggest using bread flour rather than regular flour and using instant active yeast rather than just regular active yeast.
Hi. I made these and although the color and texture were perfect, they had zero taste. Can you help? I used a fantastic yeast and it foamed nice in the 110 degree water. I used bread flour, and Maldon salt and all other ingredients in the recipe to a T. I let rise for 1 hour. Then I made the balls and put them in the refrigerator for about 8 hours. Took them out and let the thaw and rise for half hour. The baked them. They look perfect and texture is perfect but zero taste. I sprinkled with olive oil and salt before baking.
Between the great ingredients and the good baking technique I don’t know what could be missing. Can you describe what you mean by no flavor? Happy Thanksgiving too Char!
Great taste, easy to follow as mentioned needed a little more flour but that is normal with recipes.. Had a little trouble forming the balls, they flatten out on the baking sheet, any pointers on forming to get the nice looking rolls? Made these this morning for Thanksgiving.
Hi David would love to help troubleshoot for you, did you encounter any issues with the recipe while you were making it before you formed the balls? Happy thanksgiving!
I had the same problem. Instead of making balls, I just formed it into one loaf. It flattened before baking but rose triple it’s height in the oven. Hope this helps!
I’m confused by the flour requirements. You said to blend in 2 cups of the flour, 1/4 cup at a time. But the recipe calls for 3.5 cups of flour. When do i add the remaining 1.5 cups?
You’ll start with just the 2 cups of flour and then will be adding in the rest in 1/4 cup increments until the dough starts to come together. Hope this clears it up for you.
completely! Thanks for your prompt response, in meantime, i made the recipe, and more or less did what you said…they were wonderful – I ate 6!!!!
Wonderful! I’m so glad it worked out well for you! Happy Thanksgiving!
I’m confused. Is it 2 cups of flour or 3 1/2 cups? Thank you.
You’ll start with just the 2 cups of flour and then will be adding in the rest in 1/4 cup increments until the dough starts to come together. Hope this clears it up for you. Sorry for any confusion.
these are great! exactly what I was looking for after school on a Tuesday.
Thanks for the 5 stars. BTW, great name!
Thank you for the recipe! They came out great! I did put a pan of boiling water as recommended by some other reviewers. Ended up with a nice crunchy crust and soft chewy inside. I probably ate 5 rolls after making them. I stored them in an air tight container, but the crunchy crust was soft by the next day. I’m sure they will still be delicious warmed up though. Will be making these for Thanksgiving!!
I was confused about the flour also. Added 2 cup at 1/4 cup at a time…then added more
Also mine didn’t rise that much and not crusty on top. But they still tasted good.
The first time I made these, they were pretty flat. I subbed the regular flour with bread flour and the active yeast with instant active yeast. Also, I think the recipe calls for 3 1/2 cups of flour, but you add 2 cups first, then the rest in increments of 1/4 cups until the bread comes together.
My is not golden brown ,even I had put a butter on top of it. Do you know the reason of it?
By the way it’s tasty and very easy to do.
They might have had too much moisture on or around them and they were steaming vs getting golden brown. I’m so glad you still enjoyed them though.
This is the best bread EVER!!! Perfect soft rolls
Yay!! So glad you enjoyed them.
I have just made these rolls for the first time ever and chose this recipe. I needed to add extra flour as it was very sticky but I appreciate different flours absorb different amounts of water. I tweaked it by brushing the rolls with water instead of butter and sprinkling them with poppy seeds. Absolutely delicious was my verdict and they were described as divine by my neighbour. Thank you so much for my new go to recipe.
I’ve made this twice now. Both times I had to add more flour, but it turned out great both times!
First time I made the individual rolls and loved them. They rose beautifully, and cooked up nice and crusty, as expected.
The second time I made a couple of loaves, which were a bit flat, but I think I let them rise too long. It was still delicious, and we used one loaf for a homemade pizza base. YUMMY!!
First time using this recipe. But in stead of making rolls, I made loaf of French bread. Loaf came out perfectly!! All of did was add little more baking time. And when my oven was preheating, I put a baking tin on lower take. Once oven was up to temp put loaf in on higher rack & 4 ice cubes in preheated tin.
Thanks for the suggestion, Tina.
I have made this recipe twice in the last couple of weeks and they turned out perfect both times. The second time I made them I doubled the recipe because the family gobbled them up in less than a day last time, turned out just as perfectly as the first time. Nice crust on the on outside and chewy and yeasty on the inside. Perfect dinner roll!
Thanks for coming back to let me know how much you all enjoyed them, Sarah!
Why does your summary say prep time 30 min, cook time 30 min, total time 60 min? I almost started this at 3:30 to be ready with supper, but it didn’t feel right that regular yeast would work so quickly. Good thing I trusted my instincts rather than the summary and was able to start it at 2 to have it ready on time.
Other than that, terrific recipe and still five stars, but had my instincts not gotten me to read the recipe prior to starting it, I would have been horribly disappointed.
Hi. You give oven temps but don’t state whether they are Celsius or Fahrenheit. Here in South Africa we use Celsius and not Fahrenheit and my thermofan oven’s max temp is 230°C. I was wondering if the spraying of the rolls would be better than the dish of boiling water.
Sorry about that, all of my recipes are Fahrenheit.
Was looking for an easy and relatively fast yeast roll recipe and this filled the bill! I liked that it was all done in just a few hours rather than the overnight recipes. Like some others, I used at least 1/2 cup more of flour than the recipe called for. I used a mix of AP and Bread flours, and used garlic-infused olive oil instead of the veg. oil. I also used the pan of boiling water on the bottom rack as well as spraying the rolls. Set the timer for about 13 minutes but kept adding time so it was pretty close to the 18-20 in the recipe. They came out crusty enough when eating right away. The crust softened up as I stored the leftover rolls, but I’m sure they’ll warm up well! Thanks for this recipe.
So good. Success one the first try. I did not have any vegetable oil,so I used crisco.
dough was really sticky and i ended up adding around 3/4 cups more flour than indicated, just to get the dough begin to pull away from the mixer bowl. Managed to shape the rolls ok just the same and the rolls came out OK.
I didn’t have enough AP flour on hand, so I used bread flour btw. Would that have been odd factor?
It could’ve have.
I also had to add 3/4 cup of flour, but I used AP flour like the directions
This is a fantastic recipe! Instead of small rolls, I made rolls for steak sandwiches and they were awesome. The family loved them. I’ll definitely be making again.
Thanks for the 5 stars, Denise.
These are decent rolls, but they are NOT chewy, crusty, or french. I followed the directions to a tee, and they are the exact same soft dinner rolls as every other dinner roll recipe out there. I wA intrigued by browsing your freezer instructions, then realized there really weren’t any. You state they can be frozen unbaked but give no indication of a 2nd rise time or baking length.
Why do the ingredients say 3 1/2 Cups of flour and the directions say, add 2 Cups of flour. Was it supposed to say add 3 Cups of flour?
The instructions have you start with 2 cups and then add in the additional flour in 1/4 increments until the dough starts to come together. You won’t want to add it all in at once. Hope this clears it up for you. Enjoy!
wish it had said that in the directions. additional flour….
Delicious
The buns tasted great, but took some rejigging of ingredient amounts. The dough was very soupy after mixing so, after searching through other online recipes, I added an extra 1/2C of flour.
First rise went well and forming the buns went well too, but after the second rise, the bun shape was lost and I had more of a rectangle of square shaped buns that needed to be cut apart.
Any hints for dealing with these sorts of problems? I enjoyed the taste of the buns, so will likely try the recipe again.
I switched from US Customary to Metric, but only the flour amount changed. Any chance you’ll be updating the recipe so that all ingredient amounts can be in metric?
Thanks for letting me know about the metric measurements. I went through yesterday and adjusted it so hopefully it sticks and shows for you next time you want to try this recipe.
I’ve used this recipe a couple of times now. It’s easy and produces good rolls, I added onions in last time, and was great. The only thing is that they have not been crispy, even though I have followed the recipe, spraying with iced water etc. Also, for me the timing is out, they only take 10 minutes to cook in my oven.
Next time you make them instead of spraying them, try placing a pan of water underneath them while in the oven. That should help with them with being crispier. Hope this helps!
Thank you, will do
Suggestion; Make sure the oven is preheated, add a pan of BOILING water in the bottom of the oven just before you put the bread in the oven. Cold or warm water won’t work.
Metric conversion is totally wrong.
Thank you for letting me know there was a glitch in the recipe card. I’ve fixed it.
Is the US measurement correct? I want to make these tomorrow.
Yes 🙂
Taste good but no crust.
Tasted good but far too much water. Needs either half of it or double the flour.
I’m not sure what flour you made this with but the recipe as stands completely failed for me.
For a start this website’s cups-to-metric conversion is wrong – it tells me i need 375g water when I actually need between 330g and 350g. Even after adding in the extra flour to get the quantities in proportion I have the wettest, most unusable dough I’ve ever seen. I should’ve trusted my instincts and double-checked the conversion as it was way beyond the most hydrated bread i’ve ever made.
As it is, I’ve just wasted half a kilo of bread flour (which isn’t the easiest of things to get these days) and an hour or two of my time and have no bread for tonight’s dinner.
And to forestall any “did you follow the recipe?” comments, yes I did as it says, starting with 250g and adding the rest 30g at a time. It still didn’t work.
I had the same issue, the dough was soup. The second time I used a cup of water and 3 cups of flour sifted. I rose the dough twice, once for 1.5 hours then kneed, adding flour if you feel necessary, and the second time about 45 minutes. After the second rise, I cut the dough and formed balls and let them rise about 10-15 minutes, till they are puffy. I put the dough balls in a pan and let them sit in fridge for a couple of hours until they cool. This will stop the dough from rising and hold a better shape. Preheat the oven, when it’s hot, add a pan of boiling water to the bottom of the oven. The water must be boiling or at least steamy and this must be done at the very beginning of the bake. The steam is what gives you a nice crispy top on the rolls. Once you store them in an airtight container, like any bread, it will loose it’s crispness. I hear reheating at 200 degrees wrapped in tinfoil works but I’ve yet to try it.
This recipe came out just ok for me. The flavor is delicious..but, even though my dough was able to rise very nicely, when I baked them, they seemed to spread wider more than they rose higher. They also do not have that beautiful sheen like in the recipe photo. I cooked the first pan for 15 minutes and they seem a lil hard but somewhat chewy. I cooked the 2nd pan a lil less and they are softer. I didn’t have a spritzer so I did what someone here suggested and put a pan of hot water in the bottom of the oven…maybe that had some affect? I don’t know. They do taste good though.
I’m not sure what I did wrong but they took a lot longer in the oven than the recipe calls for and never developed any sort of “crust”. Super disappointing.
They still tasted good but where nothing like advertised. Anyone have similar problems and could help me troubleshoot?
You can email me (contact @ dinnerthendessert .com) and we can try and troubleshoot the issue.
Just made these again and they came out just as beautifully as they did the first time. I trust you implicitly and look forward to one day having a potluck dinner party with you. You are my cooking friend in my head.???
You’re too kind!
Are the metric measurements correct? 375g of water for 437.5g of flour seems a bit off.
Thank you. I didn’t realize there was a glitch in the system. I’ve gone in and adjusted it so hopefully it shows correctly for you now.
I followed the instructions and the tips before starting. My dough was wet, running and extremely hard to handle, could not be shaped.
Ended up binning this.
I will try again, anyone shed a light on whether I can add more than the 3 1/2 cups of flour (will it be too dense?) or what I’ve done wrong?
Thanks
I’m glad you’re willing to try again. Make sure that you’re measuring the flour by spooning it into the measuring cups and leveling it off vs scooping it out. It’ll give you an accurate measure. Also, you can add more flour if needed but I wouldn’t go over adding more than an additional cup. Hope this helps!
Wow i am not great at following recipes. These were great. Whole family loved them. Looked and tasted amazing.
Hi! I had great luck with these and they turned out delicious and the outside had a fantastic crunch to it. I will definitely make them again! Thanks for the recipe!
These were sadly terrible! Followed the recipe to a tea and they ended up spread out in the pan with a minimal rise. As a seasoned baker I’m surprised!
Did you check the expiration date of your yeast?
Hope these will freeze ok?
Yes 🙂
Hi Sabrina. My rolls came out a bit flat (and in turn a bit dense, although lots of small air bubbles). From reading the comments I think I’ll knead a bit longer as it’s being done by hand. One question though, when I took the rolls out the oven they were crispy. One they cooled the crispness vanished ?? Any ideas on what could have gone wrong?
Instead of spraying them, try placing a pan of water underneath them in the oven. That should help with the crispiness of the rolls. Good luck!
I bake a lot. One way to ensure crusty crisp crusts is at the end of baking, turn the heat off, put a wooden handle spoon in the door of the oven and allow bread to cool in the oven.
If I wanted to make double the recipe, should I double all the ingredients including the yeast.
I’ve made them a couple of times and really enjoyed them.
Would it be any good if, instead of spraying them, I put a pan of water at the bottom of the oven, would it have the same results – crispy outer.
Yes, you could try that too. So glad you enjoy them so much.
I made these today and they turned out beautiful. Very nice flavor. Will go great with the chicken vegetable soup I made. Thank you for a great recipe.
If I wanted to make double the recipe, should I double all the ingredients including the yeast.
I’ve made them a couple of times and really enjoyed them.
Would it be any good if, instead of spraying them, I put a pan of water at the bottom of the oven, would it have the same results – crispy outer.
Yes, you’ll want to double it all. I haven’t tried the pan with water method before but I’ve seen others use it with success. If you decide to try, I’d love to know how it turns out. thanks!
I made these yesterday (5/5/20). It was easy. But there are two things I want to improve. In spite of covering the rolls with melted butter and spraying the rolls with ice water before and half way through cooking, the crust did not turn out shiny nor truly crispy/crunchy. Also, the interior of the rolls was a bit more dense than I’d like. How can I get the inside of the rolls to be fluffy/less dense (e.g., more air pockets) and create a crust that comes out a shiny, crispy golden brown?
I cant reccomend this recipe because I’ve done the dough twice and cant get it to rise so a complete waste of a day
I used this recipe so many times, as I’ve seen others state the same. If you’d like for me to help you troubleshoot and see what the issue might be, feel free to email me at contact @ dinnerthendessert .com
Mine raised perfectly, a wonderful dough and a great recipe 🙂
Thanks, Lisen.
Easy to make and delicious! Good leftover the next day if you toast them a little. I used bread flour and instant yeast, made no other adjustments and they turned out great. Will definitely make again.
If I freeze my dough before I let them rise a second time, how long should I let them thaw/proof before baking again?
Place it in the refrigerator overnight covered on a greased baking sheet to thaw. The next day, take it out and put it in a warm place. Cover it and allow it double. Timing will vary based on it being frozen originally.
Loved these! Made them in my breadmaker. The spraying ice cold water on them during baking really made them nice and chewy!
Thanks for coming back to let me know how much you enjoyed them, Linda.
I made these for the first time craving a fresh bun for a sandwich and it was delicious. My crust was crunchy, but just wondering how much water are you supposed to spray while baking?
These rolls were so good!!
So glad you enjoyed them! You just want to spray them with enough water for them to be coated with water. Make sure to spray them twice halfway through the baking process too.
Hello, I’d love to try this recipe but do not have a mixer. How long would I need to knead for by hand? Thanks
You might need to knead for 15 minutes or so if doing it by hand.