
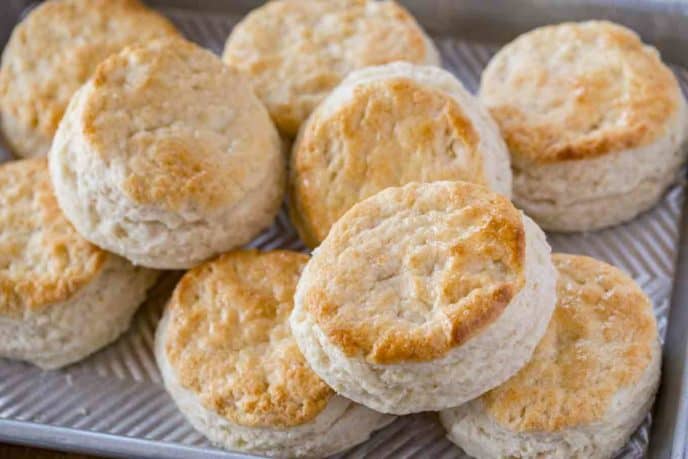
Buttermilk Biscuits are an easy, flaky, buttery addition to any meal. Serve them with breakfast or dinner, ready in under 30 minutes!
The best part of classic buttermilk biscuits is that you can make them for breakfast or even serve them for dinner with a nice stew, like Ultimate Slow Cooker Beef Stew. Or you can go simple and just serve them with some butter because you can’t go wrong with a buttered biscuit any time of day. Other yummy Breakfast options include French Toast or Eggs Benedict.
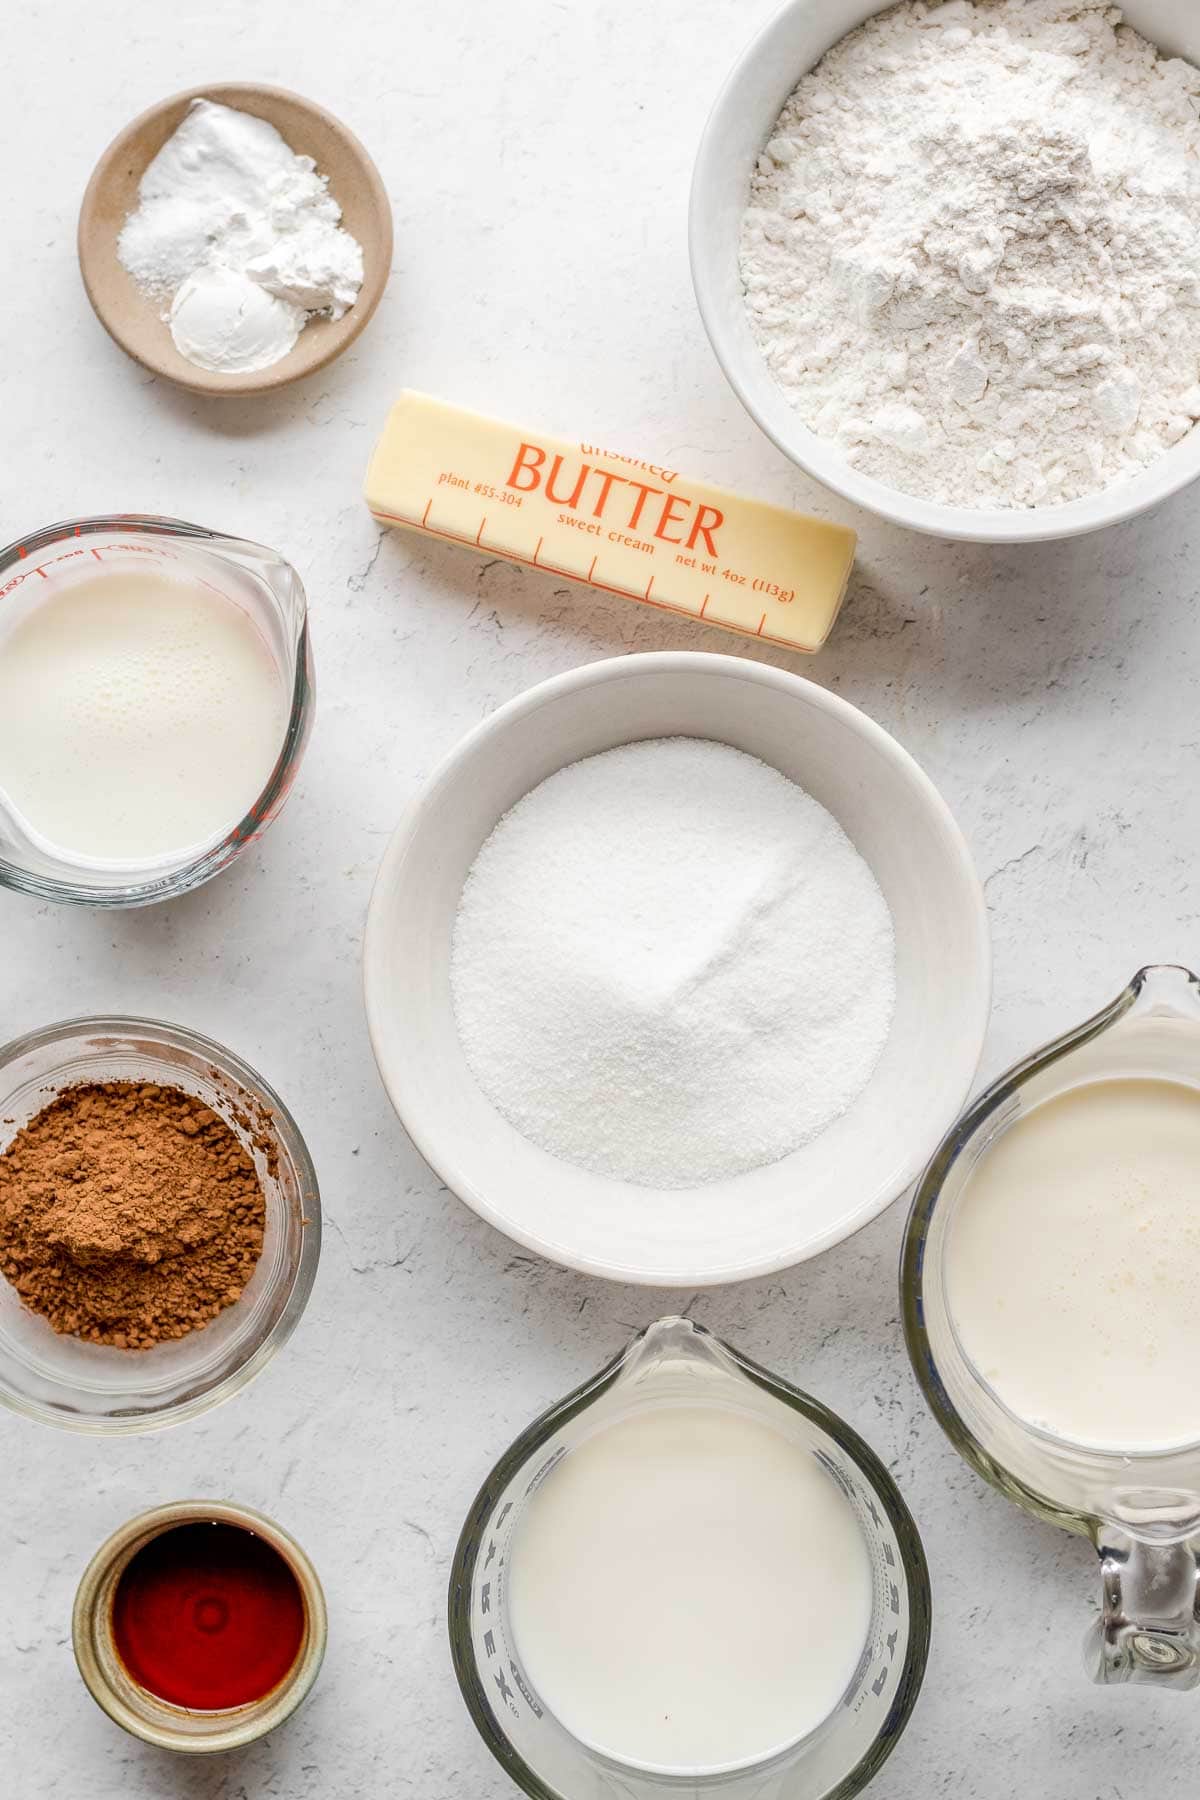
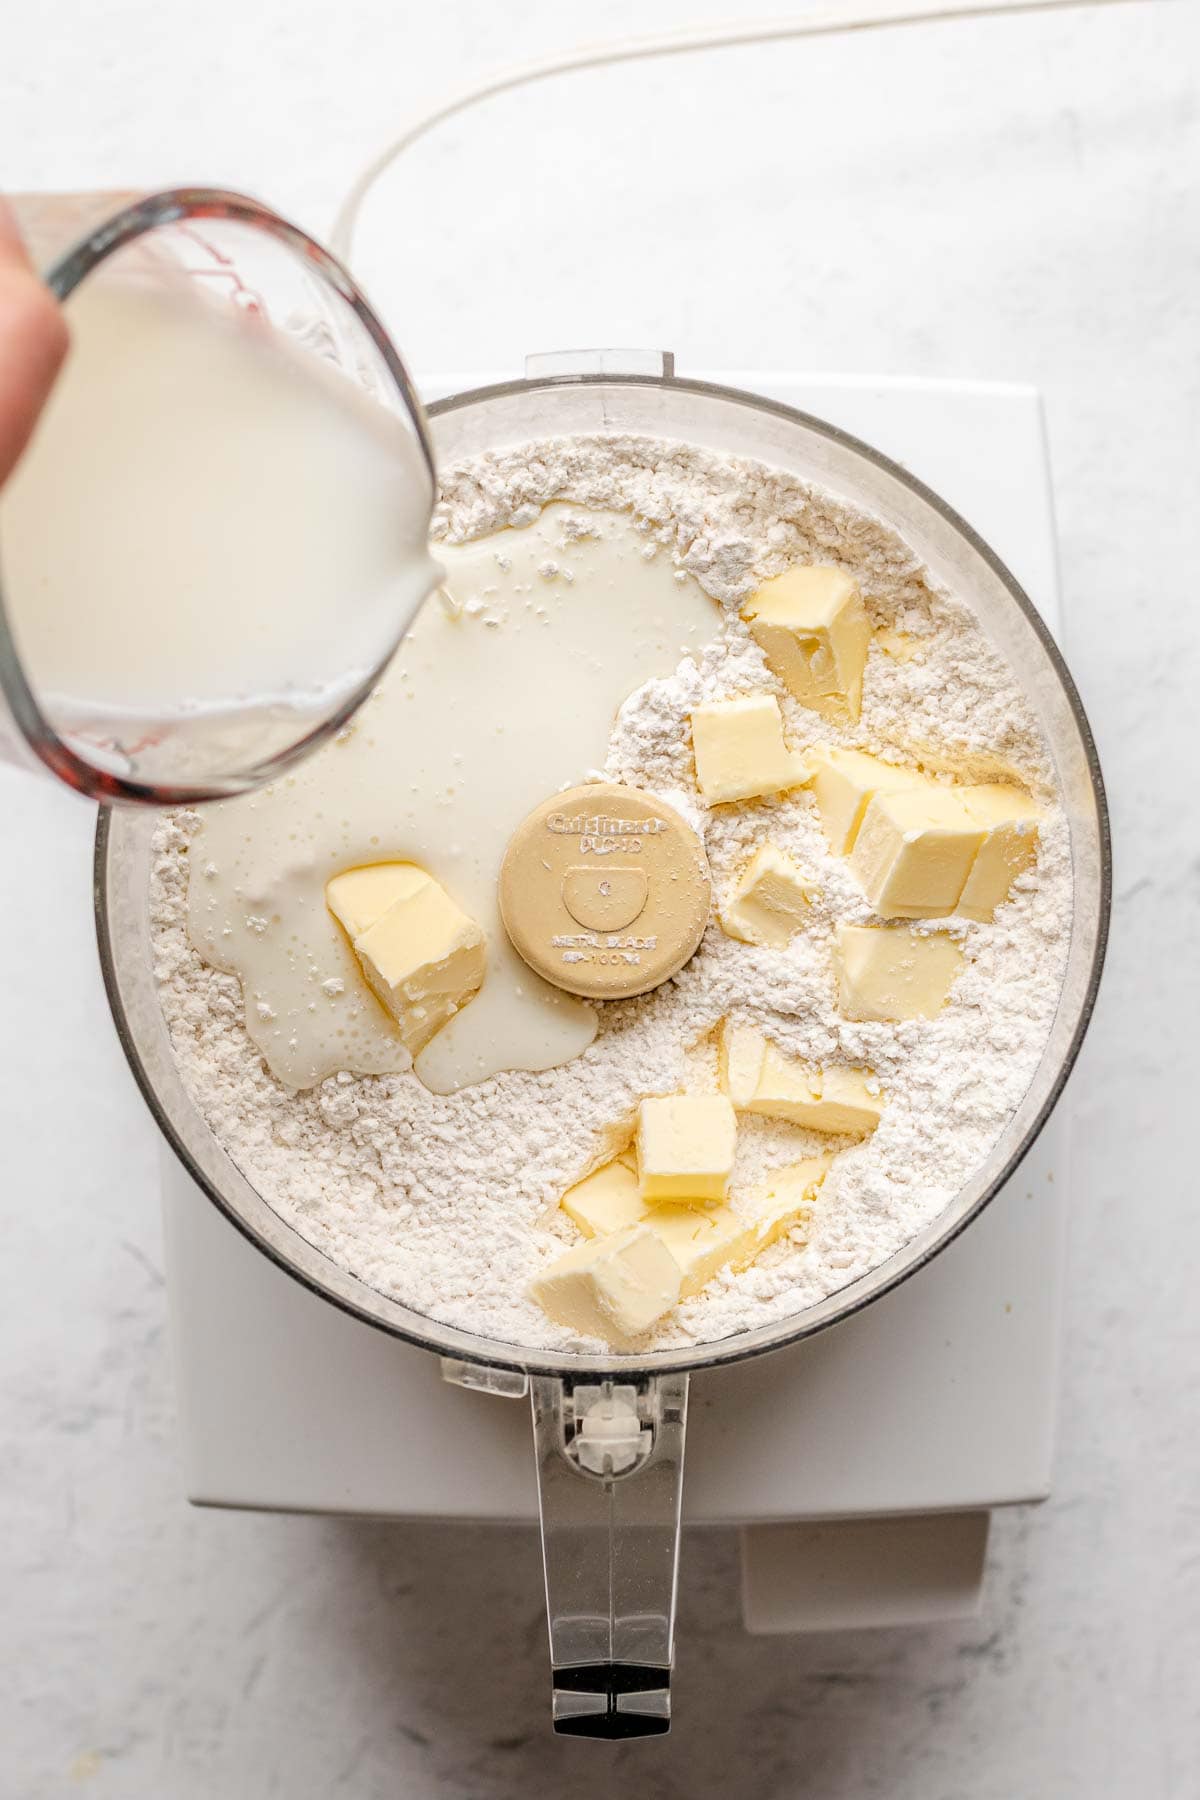
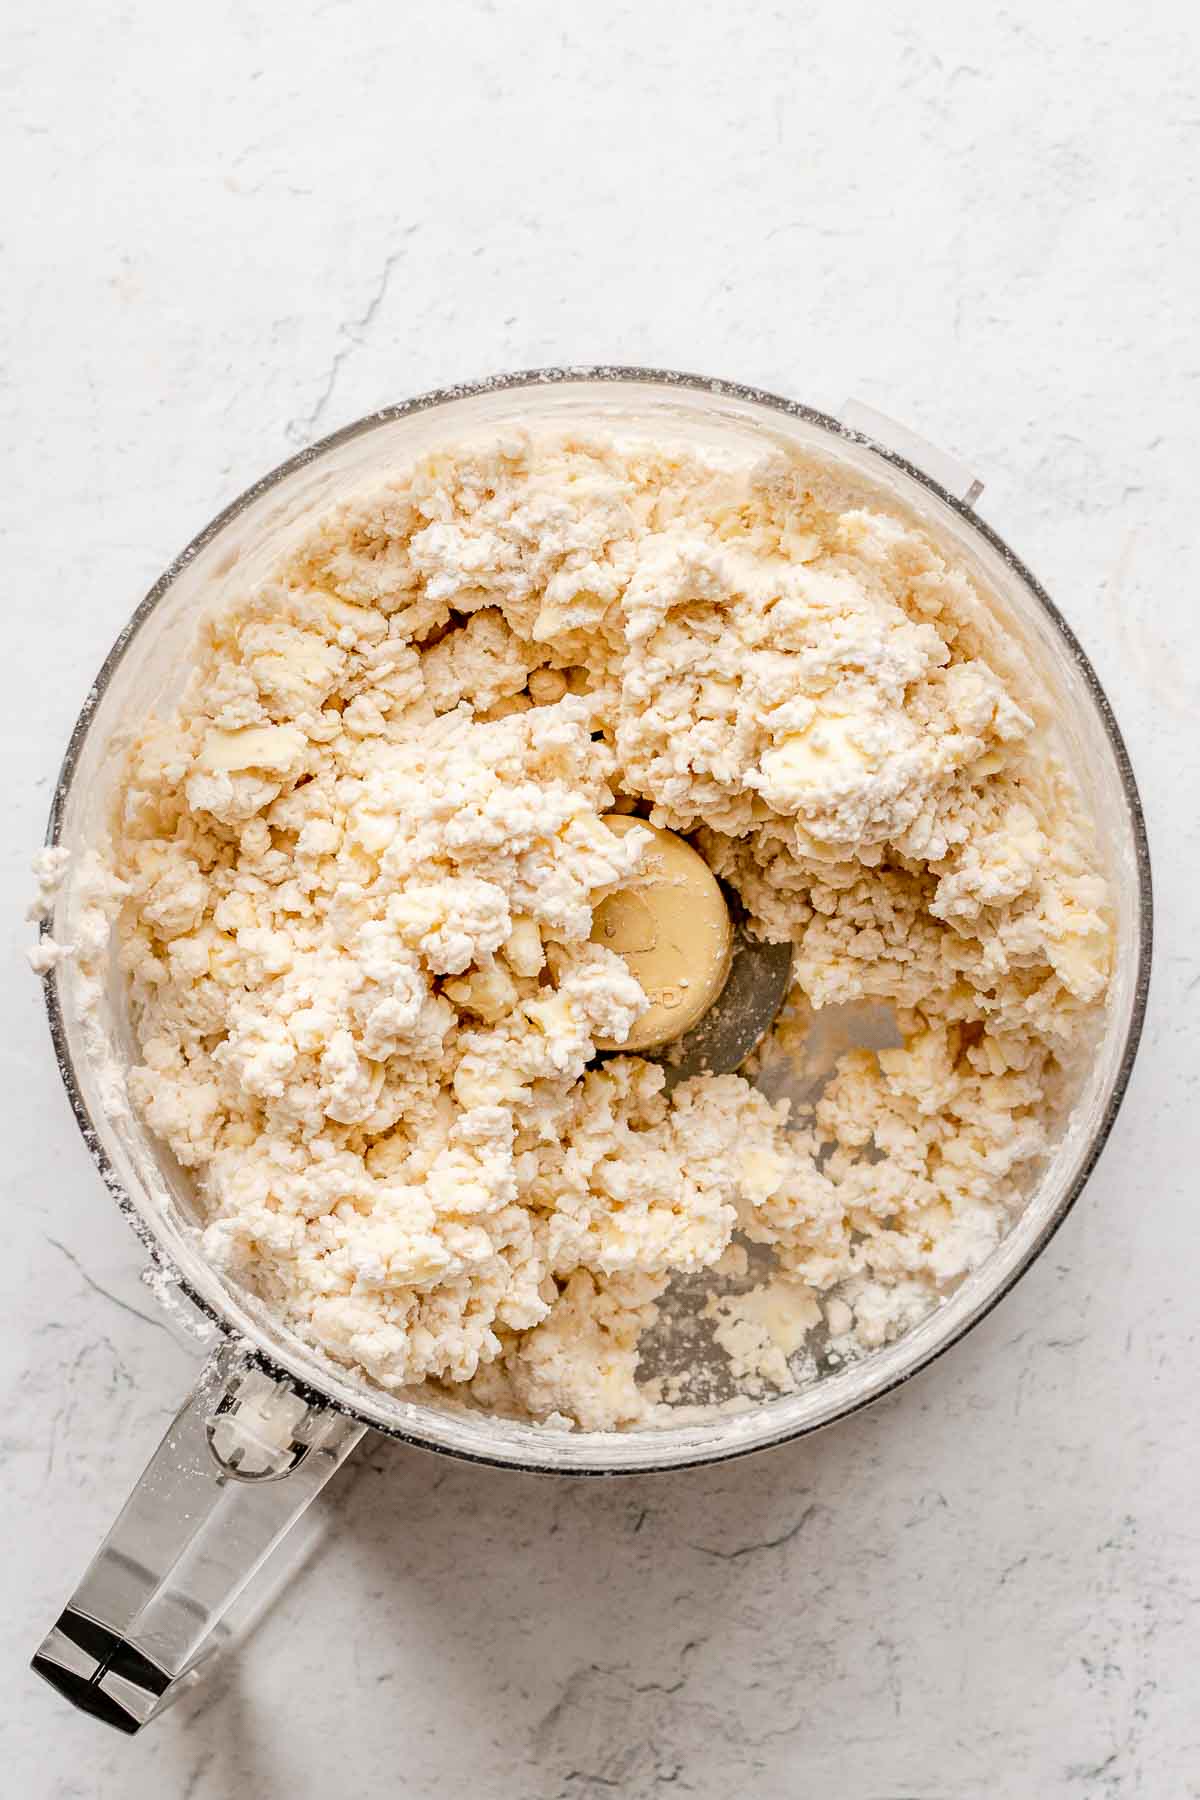
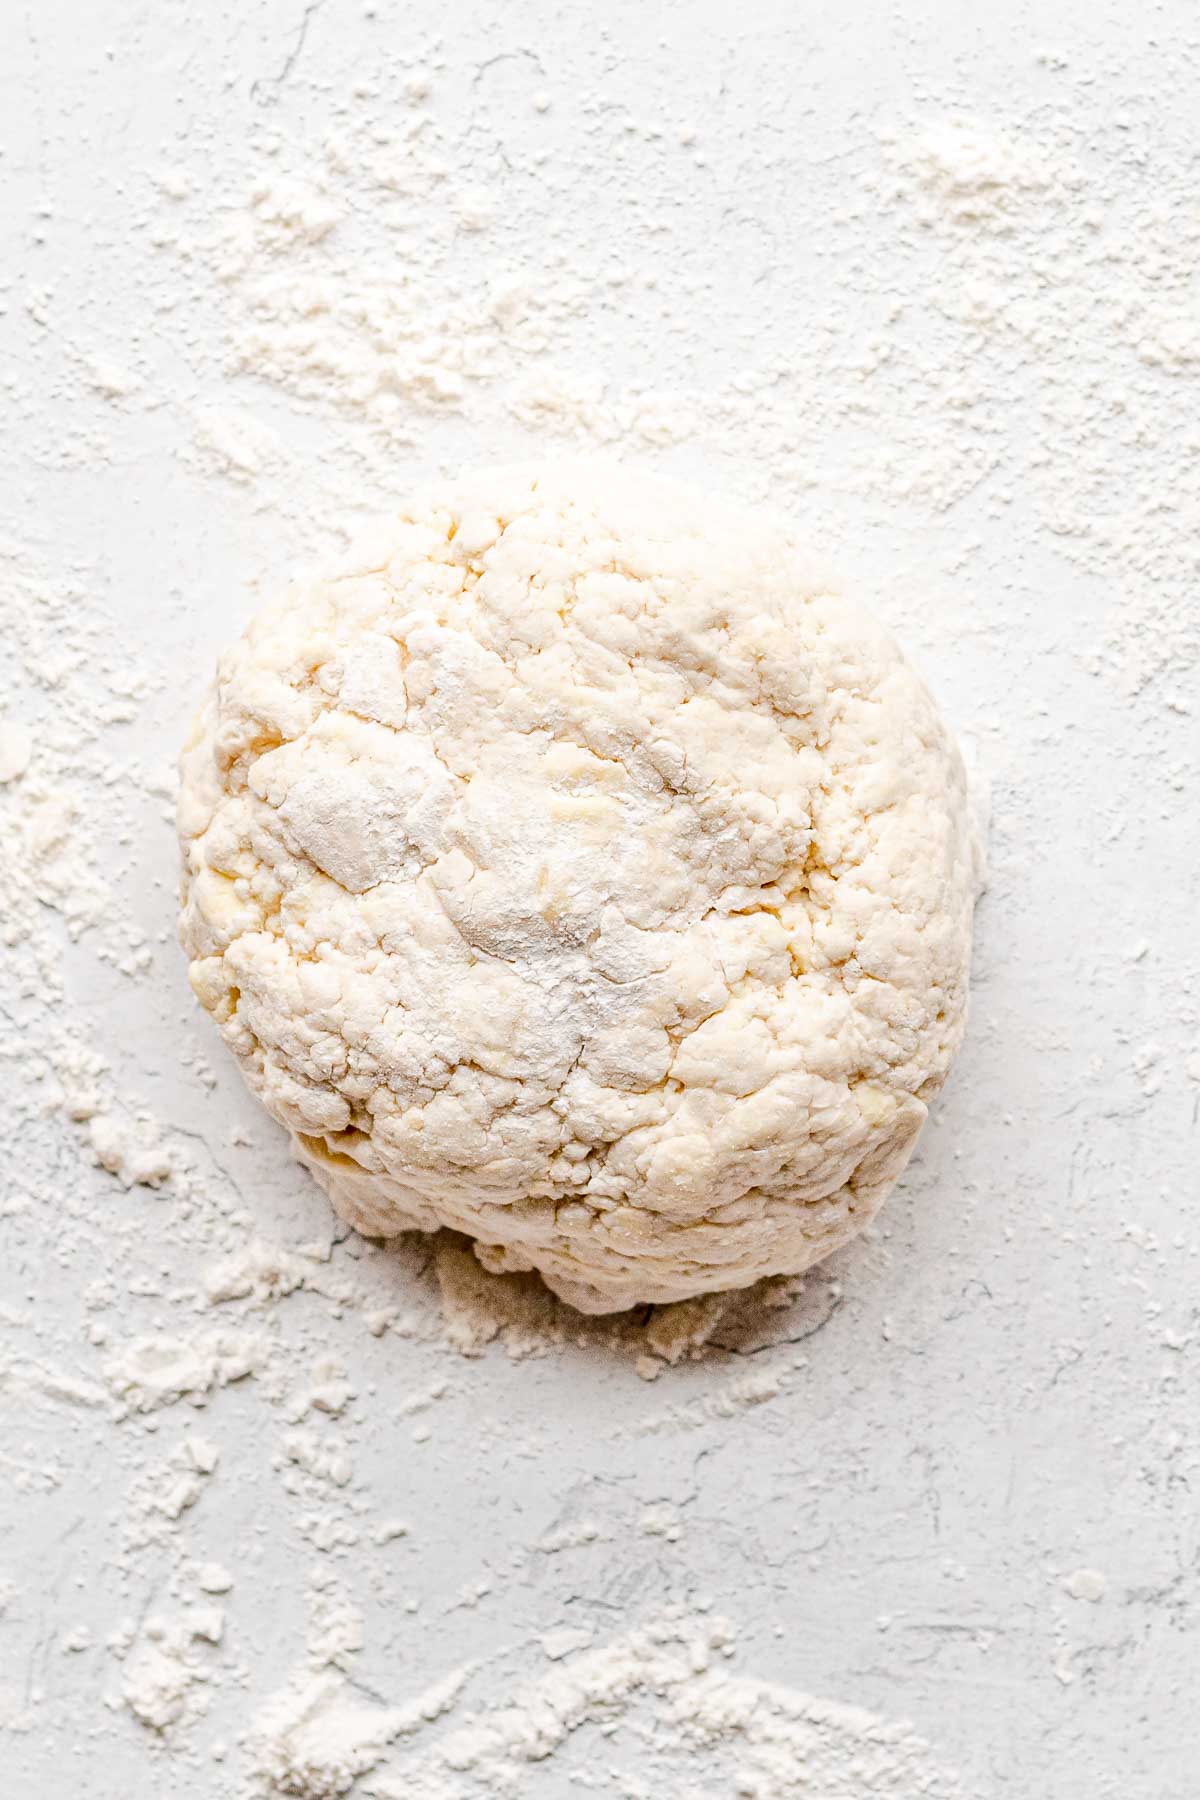
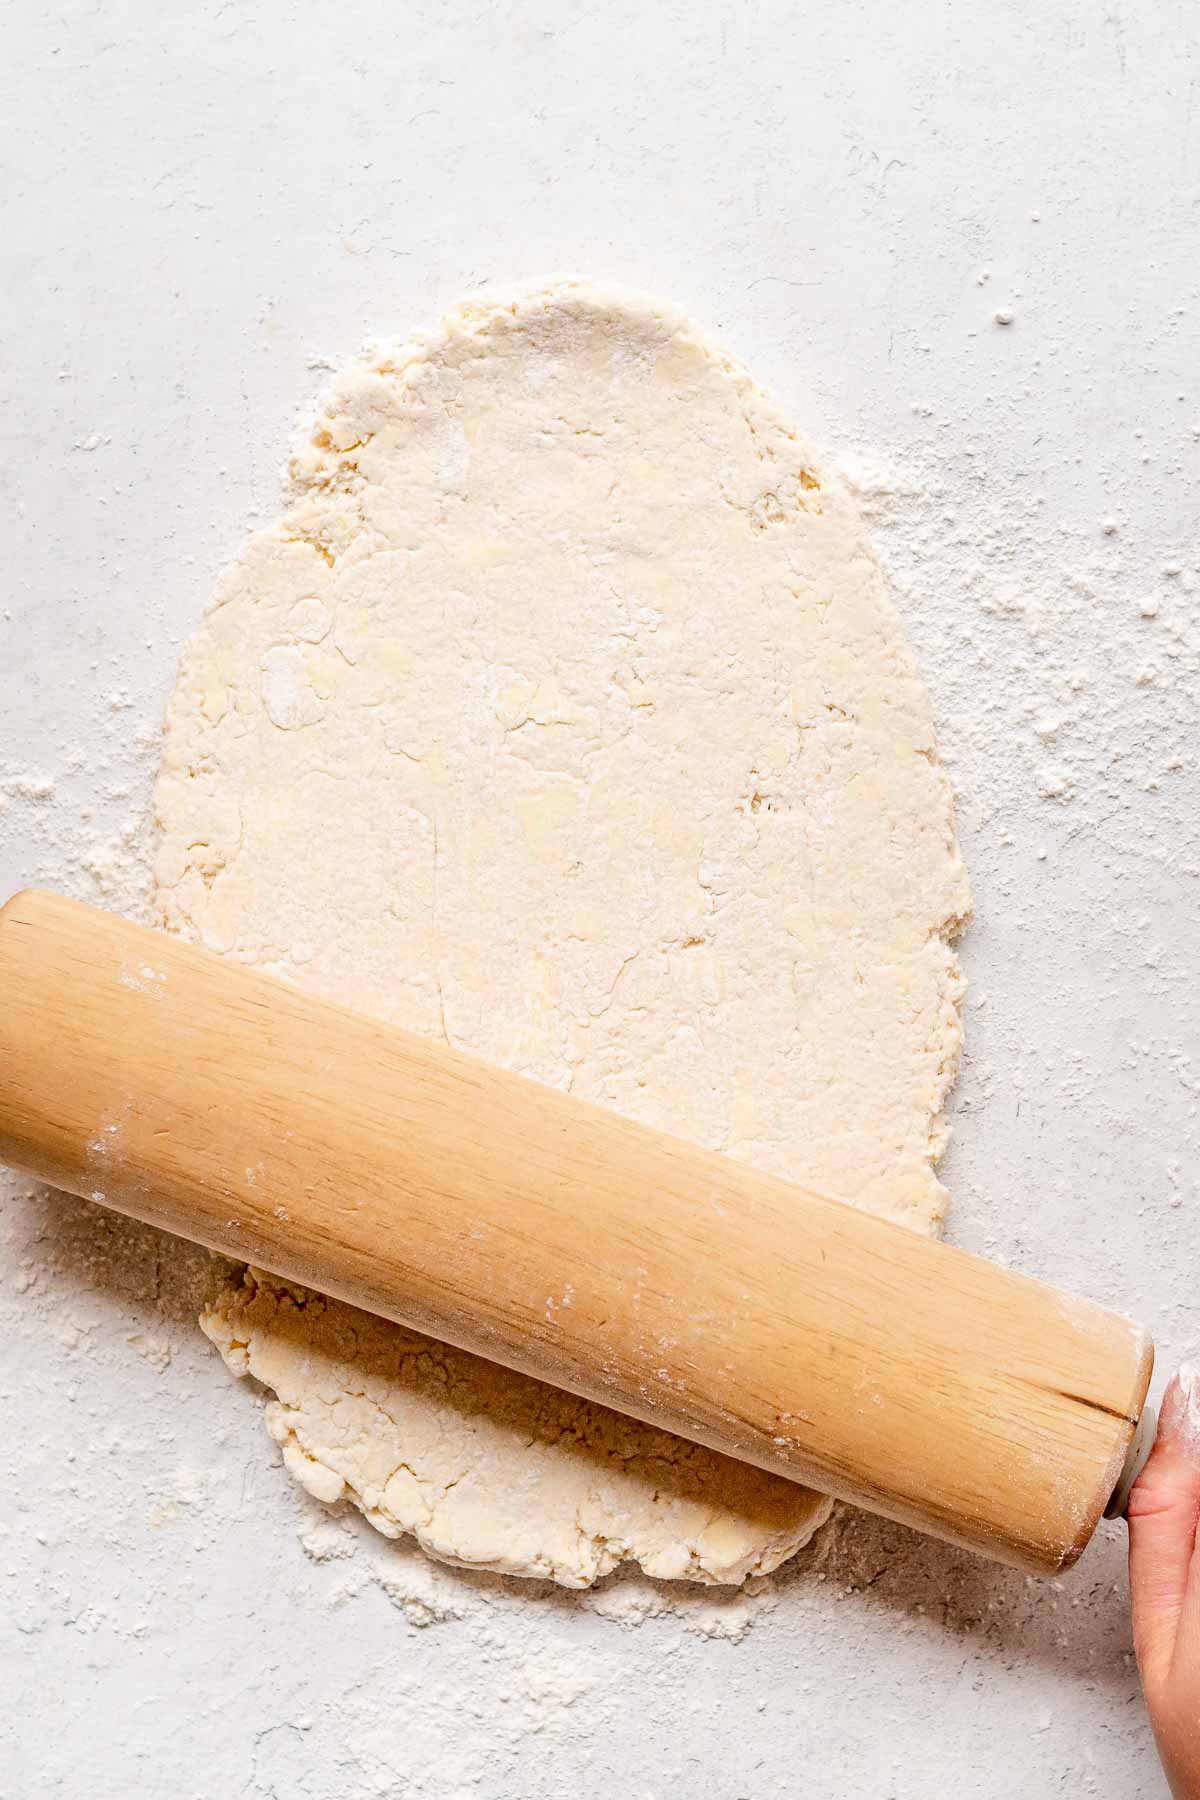
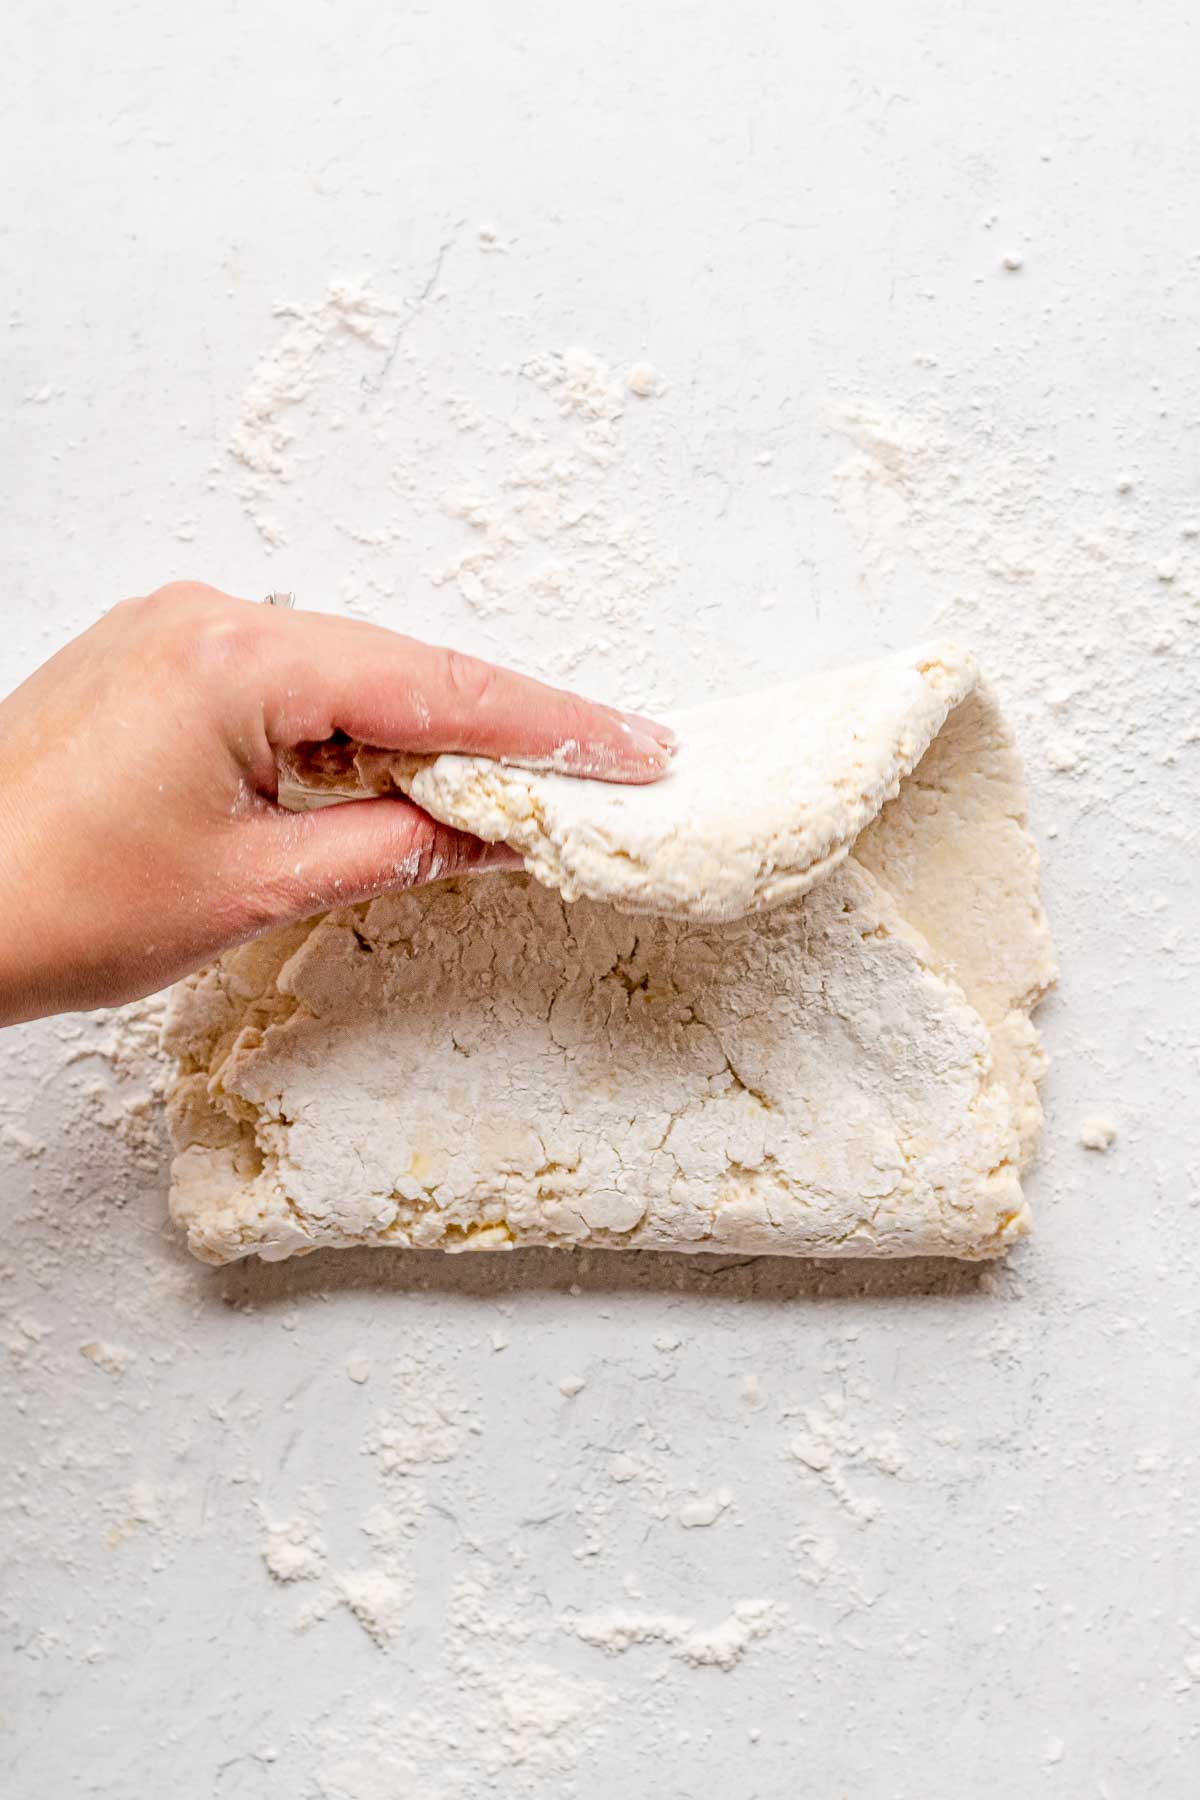
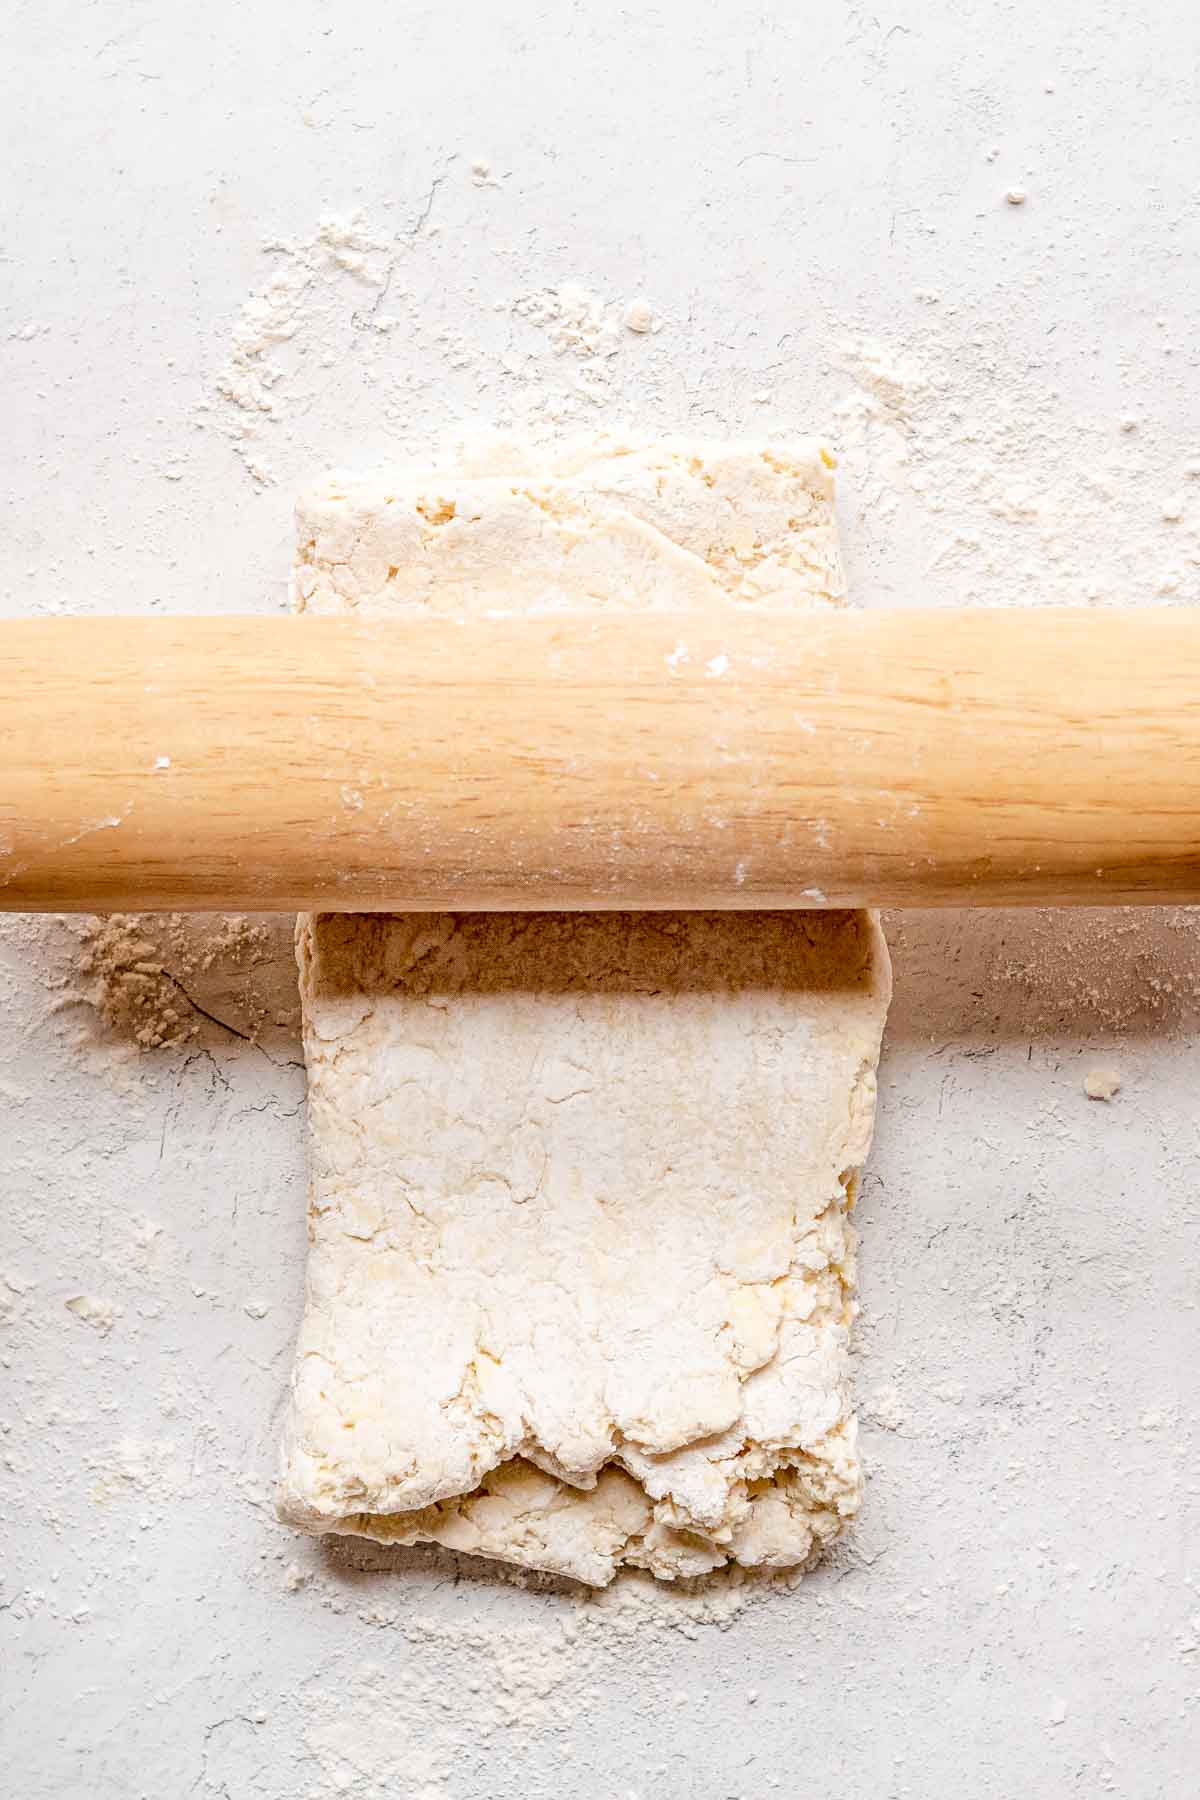
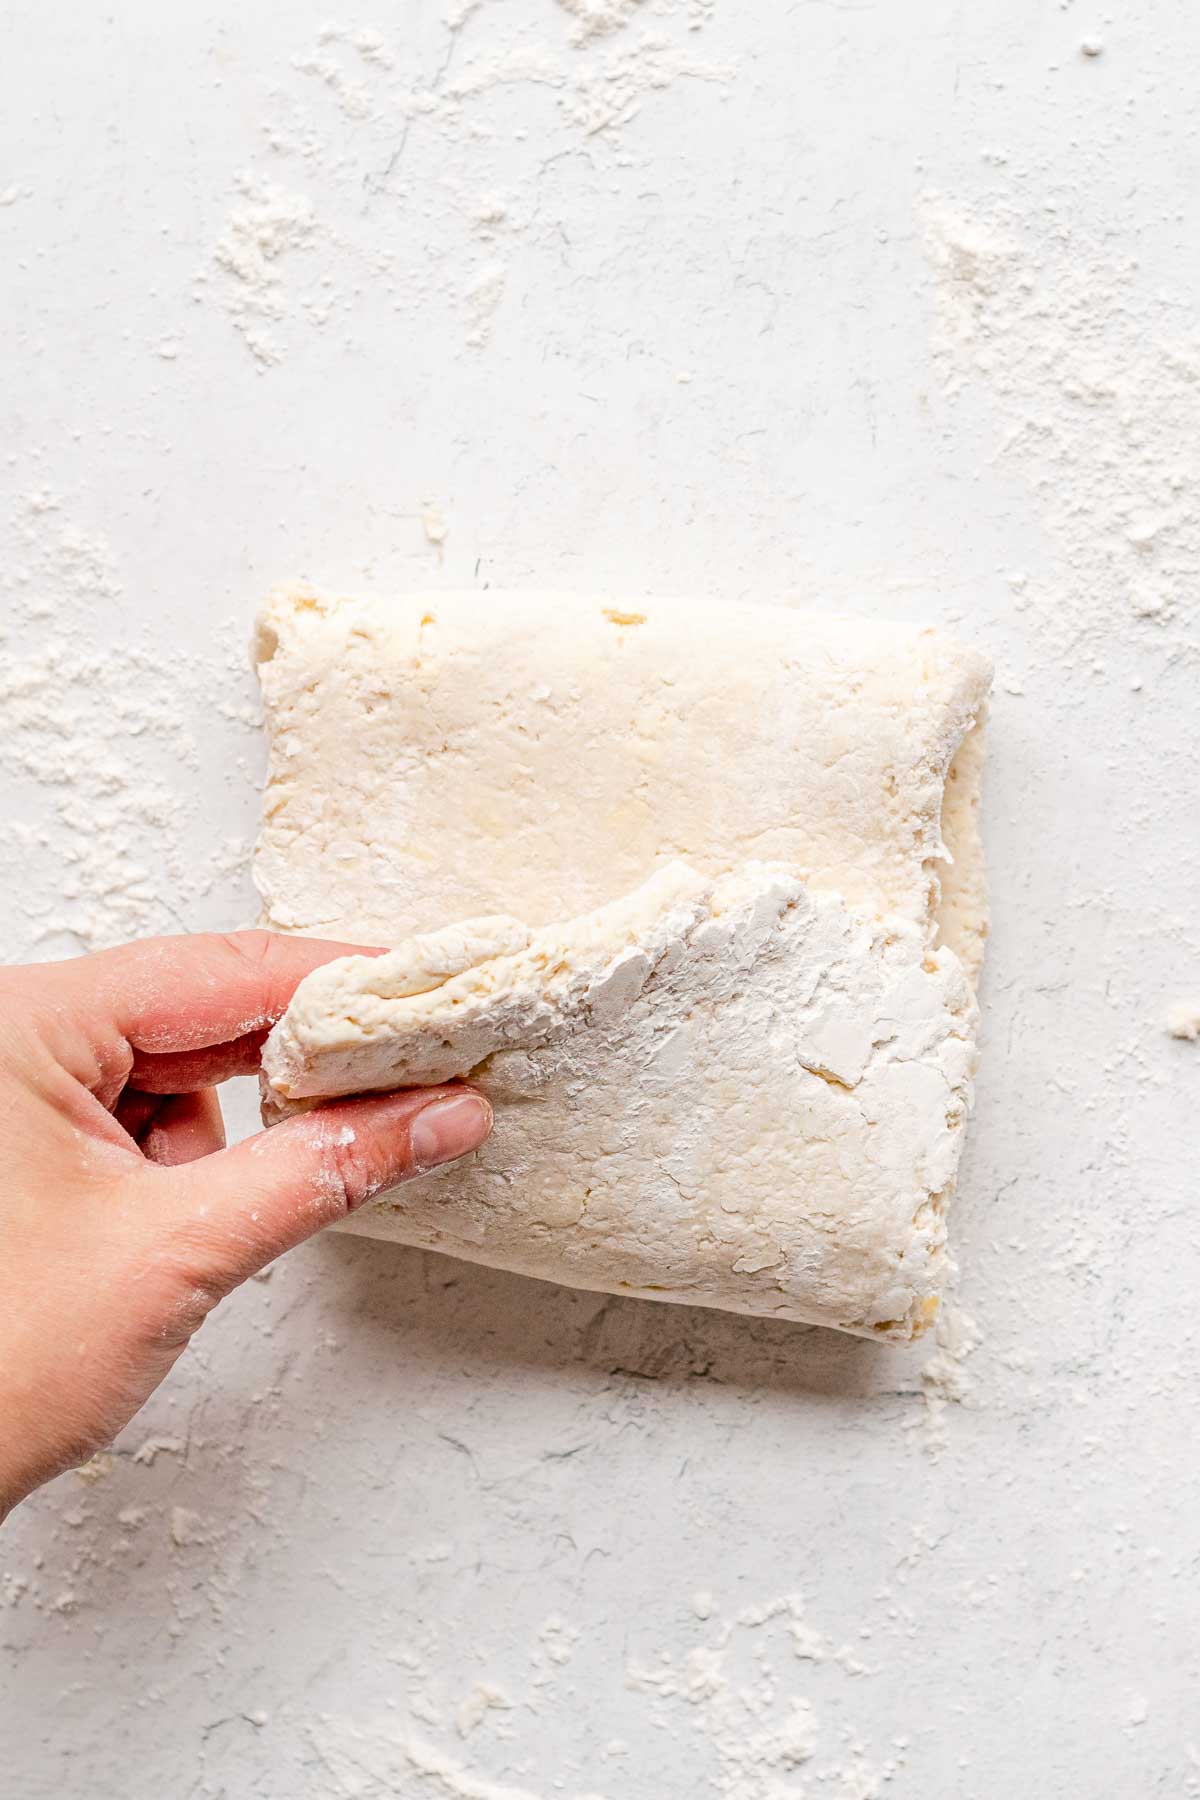
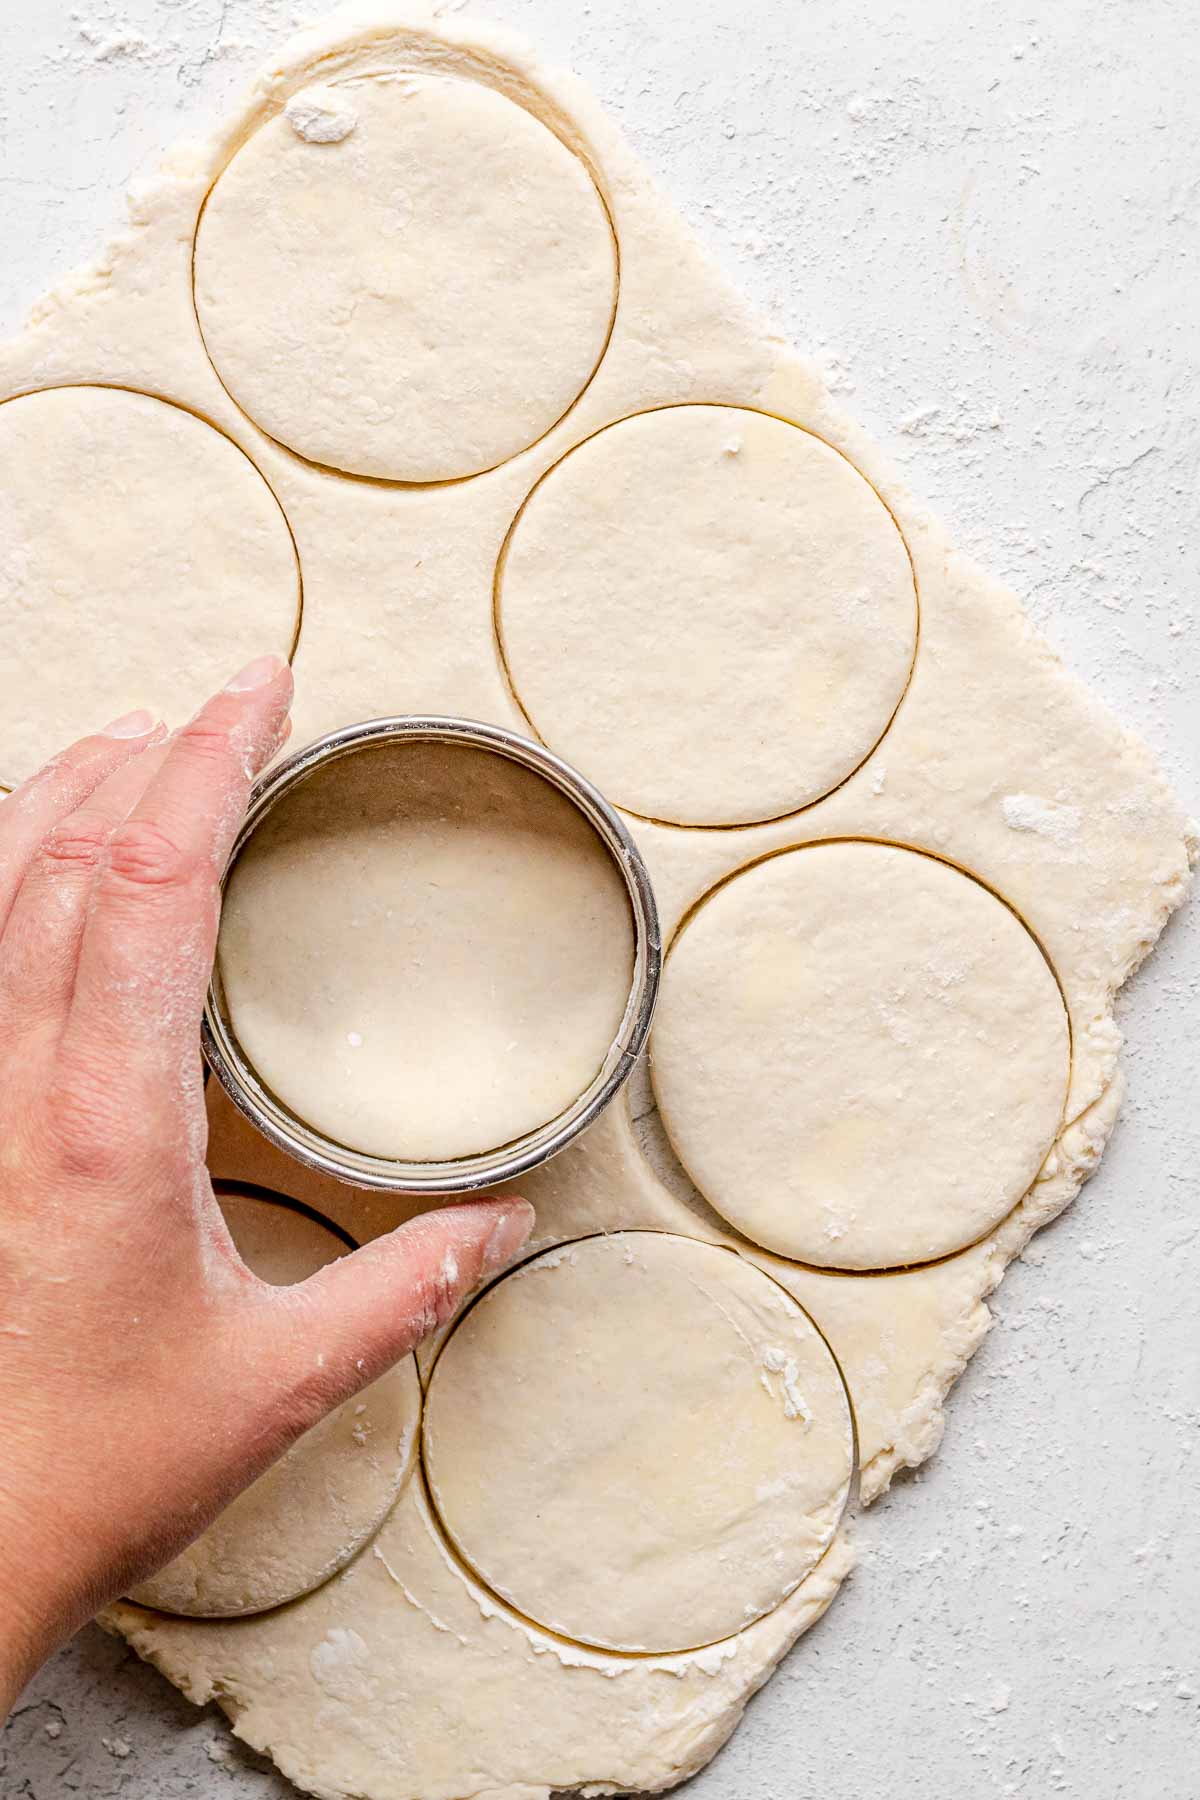
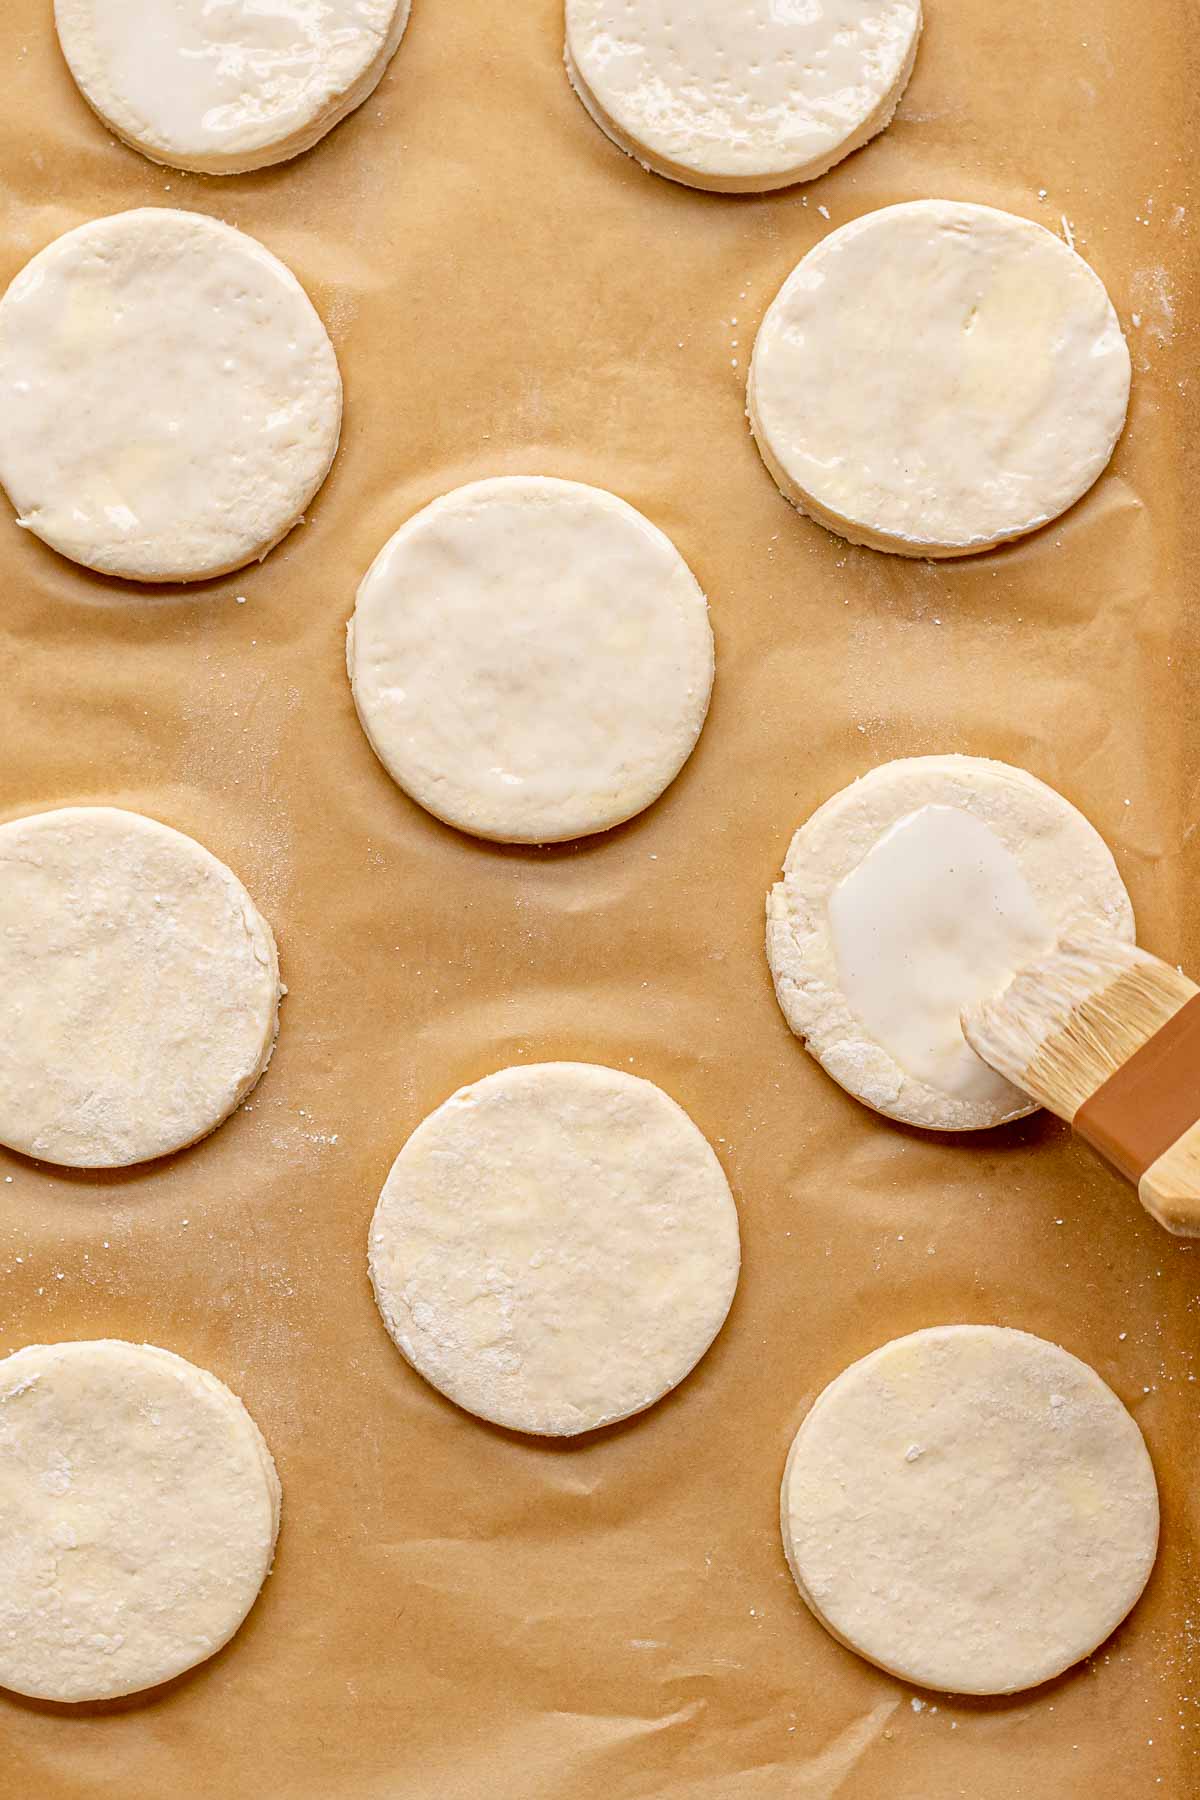
Table of contents
Sabrina’s Buttermilk Biscuit Recipe
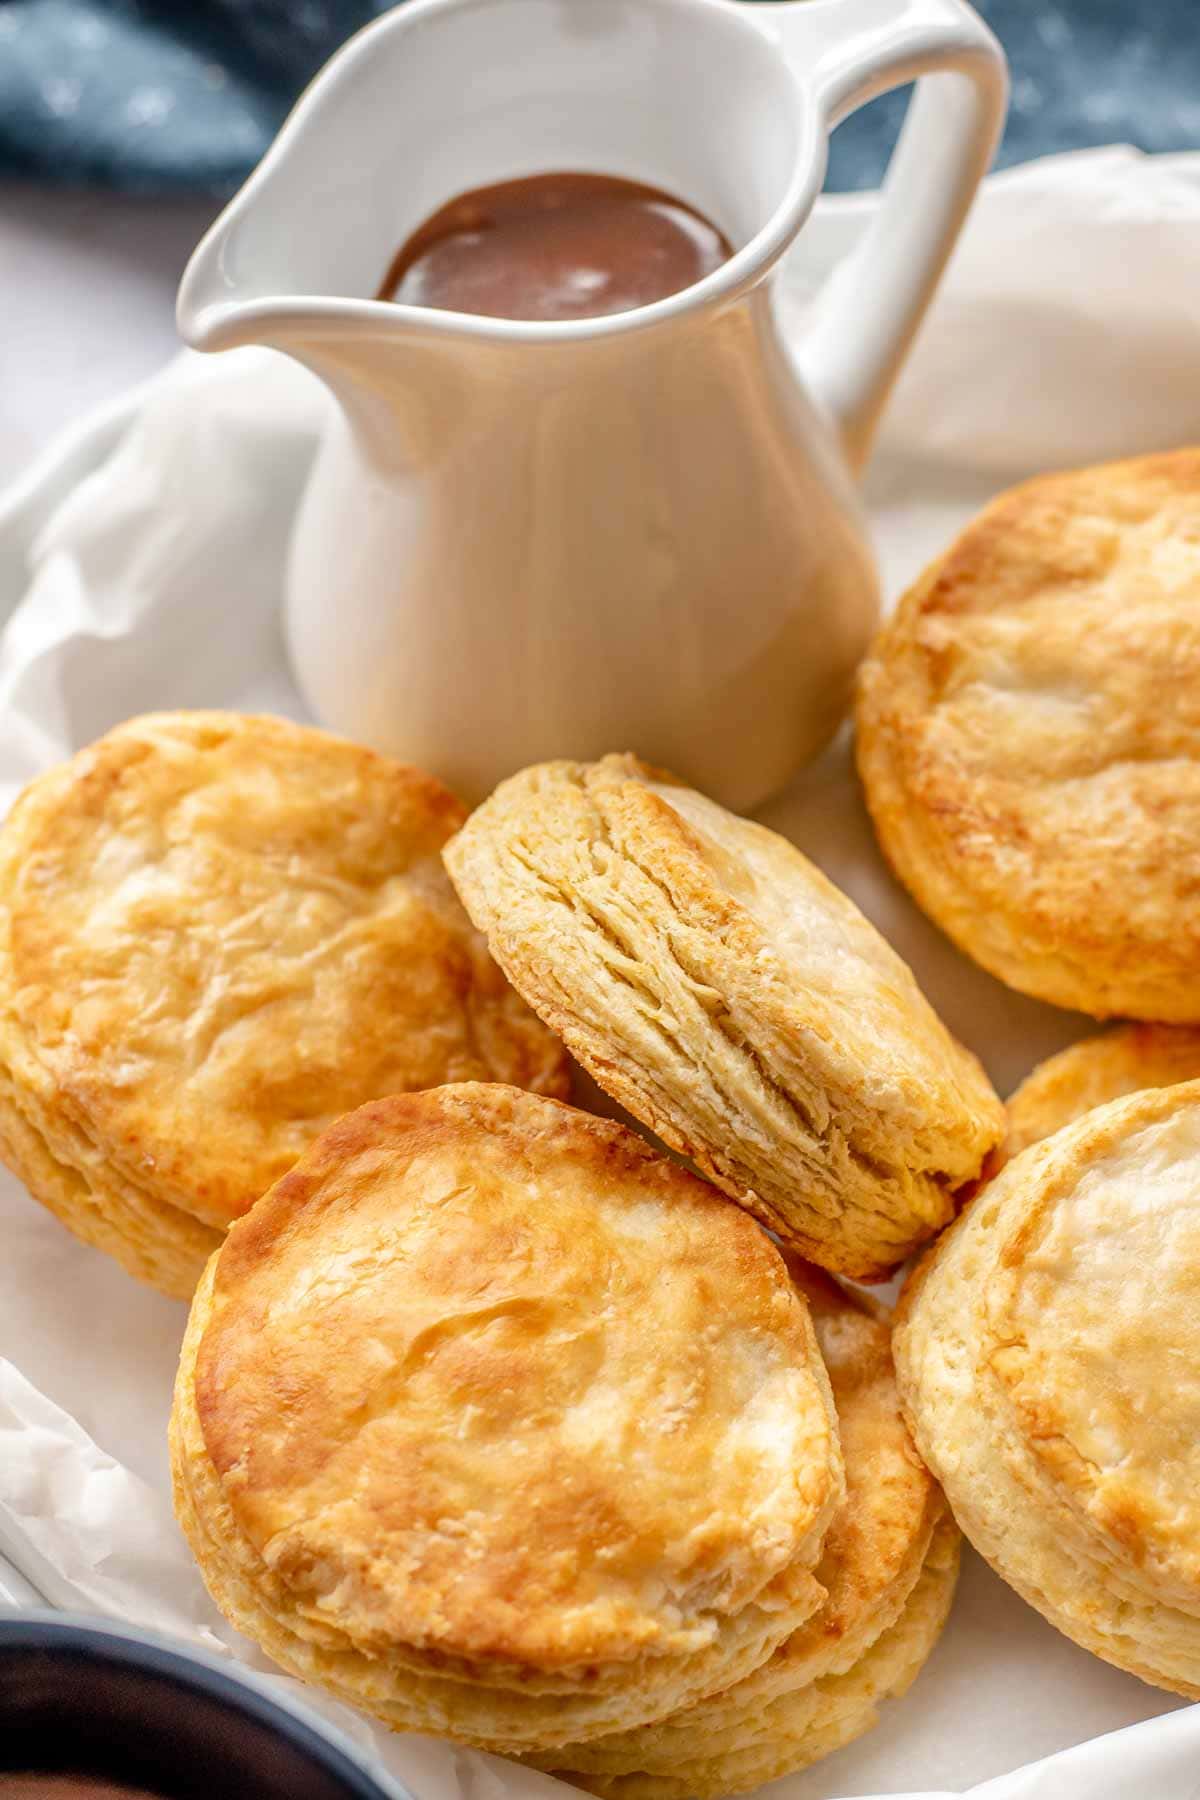
Homemade Buttermilk Biscuits are so seriously tender on the inside, with a golden brown and slightly crispy top that makes me want to have them for a meal all by themselves. Nothing says comfort food, or that dinner’s ready, like the mouth-watering aroma of biscuits baking in the oven! They’re also a really traditional side in many southern homes, so much so that people really take pride in them. You’ll be surprised at how simple it is to get restaurant-quality buttermilk biscuits from your own oven with this recipe.
The humble buttermilk biscuit, a staple in Southern American cuisine, has a unique history that dates back to pre-Civil War times. Originally, biscuits were seen as a luxury, enjoyed by the wealthy due to the expensive ingredients required. Over time, as these ingredients became more accessible, biscuits evolved into a comfort food embraced across various regions. Each area has its unique twist on the recipe, with some preferring a flakier texture while others opt for a softer, cake-like consistency. In Southern kitchens, biscuits are a beloved side dish, often accompanying meals on holidays and at family gatherings.
What sets this flaky Buttermilk Biscuit recipe apart is its focus on simple technique and simple ingredients. The process of layering and folding the dough creates an irresistibly flaky texture, while the cold buttermilk and butter ensure the biscuits are tender and rich in flavor. This recipe doesn’t call for any fancy ingredients, sticking to the basics like flour, buttermilk, and butter, but the result is a golden, fluffy biscuit that can make any meal a home-cooked meal!
Ingredients
- 2 ⅛ cups Flour: Forms the base of the biscuits, giving structure and texture. All-purpose flour works best for a light and fluffy outcome. If needed, gluten-free flour can be a substitute, but it may alter the texture.
- 1 teaspoon Kosher Salt: One teaspoon salt enhances the flavors of the other ingredients. Table salt can be used in a pinch, but reduce the amount slightly as it’s finer.
- ¼ teaspoon Baking Soda: Helps with leavening and browning. There’s no direct substitute, but leaving it out may result in less rise and a slightly different texture.
- 2 teaspoons Baking Powder: A crucial leavening agent that makes the biscuits rise.
- ½ cup Unsalted Butter, Cubed: Adds richness and creates flaky layers as it melts during baking.
- ¾ cup Cold Buttermilk (+ more for brushing): Real buttermilk provides acidity and moisture for tender biscuits. In its absence, mix regular milk with a little lemon juice or vinegar to mimic buttermilk’s effects.
Kitchen Tools & Equipment
- Food Processor: Used for combining the dry ingredients and butter efficiently. A pastry cutter or your hands can be used as alternatives for incorporating the butter into the dry ingredients.
- Parchment Paper: This is used to line the baking sheet, preventing sticking and ensuring even browning. Silicone baking mats are a great alternative.
- Rolling Pin: Used to evenly roll out the dough.
- Biscuit Cutter: Ideal for cutting out uniform biscuits.
How to Make
Time needed: 30 minutes
- Mix Dry Ingredients
In your food processor, combine 2 ⅛ cups of flour, 1 teaspoon of kosher salt, ¼ teaspoon of baking soda, and 2 teaspoons of baking powder. Give these a few pulses until they are well mixed.
- Add Butter and Buttermilk
To the dry mix, add the pieces of butter and ¾ cup of cold buttermilk. Pulse the mixture until it forms a cohesive dough. The key is to combine without overworking the flour mixture, to maintain a tender texture.
- Shape the Dough
Transfer your dough to a floured work surface. Gently form it into a ball and roll it out to about ½ inch thickness. Fold the dough in thirds, like a letter, and roll gently. Repeat this folding process two more times to create layers in the biscuits.
- Cut the Biscuits
Using a 3-inch biscuit cutter, cut out 10 biscuits from the rolled dough. Place these uncooked biscuits on your prepared baking sheet.
- Bake
Brush the top of each biscuit with a bit more buttermilk. Bake them in the preheated oven for 15-17 minutes, or until they turn a beautiful golden brown.
- Serve
Serve these baked biscuits warm, perhaps with a spread of butter or a drizzle of honey, and enjoy the comforting, homemade goodness.
Can Buttermilk Biscuits Be Made Ahead of Time?
Yes! You can prepare the dough up to two days ahead of your planned baking. Simply follow the recipe steps until you cut the homemade biscuits out. Instead of baking them immediately, place them on a baking sheet, cover them tightly with plastic wrap, and refrigerate. When you’re ready to bake, you can take them straight from the fridge to the oven. They will freeze nicely too. Just reheat in the oven at 320 degrees for 7-10 minutes when ready to serve.
Nutrition Facts
Tips & Tricks
- Chill your flour for at least 30 minutes before making your biscuits.
- Use unsalted butter in this recipe. We’re adding salt separately so we can control how much goes into the recipe.
- Be careful not to overwork the biscuits, or they’ll turn out too dense and become tough biscuits. You want to stop when the flour is just mixed with the butter.
- Place your biscuits on the cookie sheet so the sides are just touching. As they rise, they’ll help pull each other up, making them taller and flakier.
- If you don’t have a biscuit cutter, you can use a drinking glass lightly dusted with flour. But the biscuit cutter is better because it’s sharper, and the better cut helps the biscuits rise.
- Carefully measure your leavening ingredients, baking powder, and baking soda, before adding them to the flour. Like we said before, this is a quick bread recipe, so there’s no yeast to give them rise.
- Brushing the tops of the biscuits with buttermilk at the end gives them that nice golden brown color, don’t skip this! You can use buttermilk, milk, or melted butter for this step.
How to Store
Storing
To keep your leftover Buttermilk Biscuits fresh, store them in an airtight container at room temperature. They should remain delicious for up to 2-3 days. Avoid storing them in the refrigerator, as this can cause them to dry out. Keeping them in an airtight container helps maintain their moisture and prevents them from becoming stale too quickly.
Reheating
For the best ways to reheat Buttermilk Biscuits, preheat your oven to 350 degrees Fahrenheit. Place the biscuits on a baking sheet and warm them for about 5-10 minutes.
Freezing
Preserving Buttermilk Biscuits for long-term storage is easy. You can freeze them by wrapping each biscuit individually in plastic wrap and then placing them in a freezer bag. They can be stored in the freezer for up to 3 months. When you’re ready to enjoy them, thaw frozen biscuits at room temperature or reheat them directly from frozen in the oven.
Frequently Asked Questions
There are three main tricks to making dough that make this buttermilk biscuit recipe of restaurant quality.
First, after you roll out your biscuit dough, you want to fold it three ways so you have three layers, then lightly roll it out again. Repeat this step two more times. This creates layers in your dough that make the biscuits rise and become amazingly flaky. You can dust each layer with more all-purpose flour if it becomes too sticky.
Second, when cutting the biscuits, push the biscuit cutter down in one movement, making sure not to twist the cutter. This avoids sealing the edges of the layers of dough, which prevents it from rising.
Third, use frozen butter when making any biscuit recipe to help achieve a tall and flaky texture. Biscuits are considered “quick bread” which means they don’t use yeast, so they need help rising when they bake. Cold butter creates steam, which helps pull the dough up as it cooks.
1. If your biscuits are burning on the bottom, your cookie sheet might be too close to the heating element in your oven. Try moving the biscuits to a higher rack to avoid burning the bottom of the bread.
2. If that doesn’t work, it might be the quality of your pan. You can try doubling up the cookie sheet to help the heat conduct better.
3. If you are having issues and you think you’ve got good quality cookware try using a silpat to help disperse the heat away from the bottom of the biscuits.
Shortening can be substituted for butter in equal amounts in this biscuit recipe. Refrigerate the shortening, just like you would with butter. A good rule is the colder your ingredients, including your dry ingredients and buttermilk, the better for making biscuit dough. You might get more crumbs if you use shortening in your dough instead of butter, but your biscuits should also bake up with a flakier texture.
Add the frozen unbaked biscuit to a cookie sheet and brush with buttermilk or milk. Cook at 475 degrees (preheat before adding the biscuits to the oven) for 8 minutes then turn off the oven. Let sit in the closed oven for 5 minutes before removing. If you look through the window and the biscuits are not browned, let them sit for 2-3 additional minutes in a turned-off oven.
If you run out of buttermilk you can substitute 1 cup of milk mixed with 1 tbsp lemon juice. The acid from the lemon juice replaces some of the acids naturally occurring in buttermilk. Typically you can do this substitute with any biscuit recipe calling for cream or buttermilk.
Stir it together and try to let it sit for a few minutes before adding it to the dough. You can do this before cutting your butter into the dough, by the time you’re done your buttermilk substitute will be ready. Vinegar will also mimic the acidity in buttermilk if you don’t have lemon juice.
Recipe Card
Ingredients
- 2 1/8 cups flour
- 1 teaspoon kosher salt
- 1/4 teaspoon baking soda
- 2 teaspoons baking powder
- 1/2 cup unsalted butter , cubed (even better if frozen)
- 3/4 cup cold buttermilk , plus a bit more for brushing
Instructions
- Preheat oven to 425 degrees and line your baking sheet with parchment paper.
- Add the dry ingredients to a food processor and pulse two to three times until combined.
- Add in the butter and buttermilk and pulse until combined.
- Put the mixture onto a floured surface and pat into a ball then roll it out ½ inch thick.
- Fold dough over on one side, then the other so you have three layers. Roll it out gently, then fold it over three ways and roll gently again. Repeat folding once more and roll it out.
- Using a 3 inch cutter stamp out 10 biscuits.
- Place the biscuits on a cookie sheet, brush with remaining buttermilk and bake for 15-17 minutes.
Notes
- Click on the “yield” amount to slide and change the number of servings and the recipe will automatically update!
- Click on times in the instructions to start a kitchen timer while cooking.
- To convert measurements to grams, click on the “Metric” option next to “Ingredients” in the recipe card.
Nutrition
Want to save this recipe? Create a free account to easily save your favorite recipes
More Yummy Biscuit Recipes

Photos used in previous versions of this post.


I made this! When I got the biscuits out of the oven, I can see the three layers! This is a family breakfast favorite from now on.
We love these biscuits too. Thank you for your five star vote of confidence, Nina 🙂
Haven’t made these yet. Will do so in about 10 minutes, but I wanted to tell you that your recipes are always so good and so doable. Thank you so much
These sound delicious! I want to make these ahead of time for Saturday morning breakfast, can’t wait. Can these be put in the refrigerator overnight then bake in the a.m.?
Yes 🙂
I know you are a chef and amazing for sure! I am old and like shortcuts. I have been cooking for over 50 years and can make a pan of biscuits by hand in about 5 minutes and have them in the oven, cooked and on the table in under 15, according to how many on the pan. No putting you down or bragging, but growing up, we had chores and many waiting to eat, no mixers or gadgets, we just got it over with. I put the flour, shortening, milk (it can be buttermilk, regular milk, 2%, low fat, canned, powdered, anything) by adjusting the shortening, no rolling it out on anything. Stir it up with a spoon, my mother-in-law used her hand! Sprinkle flour over the top and form spoonfuls into a biscuit and place it onto a greased pan. One bowl, one spoon, one pan to clean. The best pan I have is the lid from a old lard bucket blacked from use over the years. It is clean, believe me, just old. Biscuits are melt in your mouth good. I don’t blame anyone for upgrading over the years, but old ways have worked for me. I like your cooking skills and learn from them too. Keep up the good work ma’am. 🙂
Thank you, Mary!
I’ve never been able to make a successful biscuit, but these turned out amazing!! I made a chicken pot pie filling to go over them and they were a big hit! Thanks for the great recipe!
You’re welcome, Mary. So glad you decided to give them a try.
How do you use this recipe to substitute for Bisquick? Eg in your sausage balls recipe? Thx.
You’ll be better at whisking together 2 cups flour, 1 tablespoon baking powder, 1/3 cup shortening, and 1 teaspoon of salt.
If you don’t have a fancy machine to make these biscuits can you make them by hand and a regular hand held mixer?
You can’t mix it with a hand mixer. You would need to cut the butter into the flour mixture with a pastry cutter instead. You’ll want them to be small pea sized pieces. I think I bought my food processor for around $30 (it’s really not fancy, lol) but a total time saver in the kitchen. Good luck!
Can table salt be used? Don’t have kosher salt. If yes, what would be the measurement?
Yes, I would use 3/4 teaspoon of table salt. Enjoy!
Been looking for this type of biscuit pan where might I purchase one.
I bought this one a few years ago from Costco. I don’t see that they have it available online anymore. It’s called Nordic Ware Prism Bakeware.
Delicious! Definitely follow the instructions to use unsalted butter. I’m so happy I found this site!
So glad you enjoyed them! Thanks for the 5 stars.
Definitely baking sheet is best. I have used round cake pan and a 9×13 pan. They just seem to bake and rise better on a baking sheet. I have been practicing with these biscuits with good results. Now to work on sausage gravy.