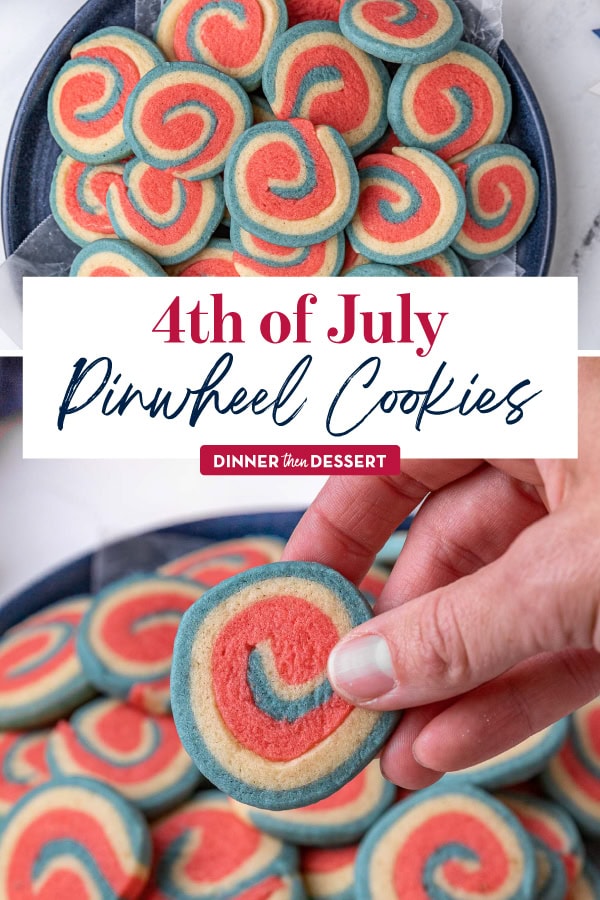
4th of July Pinwheel Cookies are an amazing, colorful, patriotic treat that kids and adults will all like to enjoy after going to the parade!
Whether you’re hosting, attending a BBQ, or staying home, this Cookie Recipe is sure to make your Independence Day even better. For more red, white, and blue dessert options this July, try my Mixed Berry Trifle or American Flag Cake.
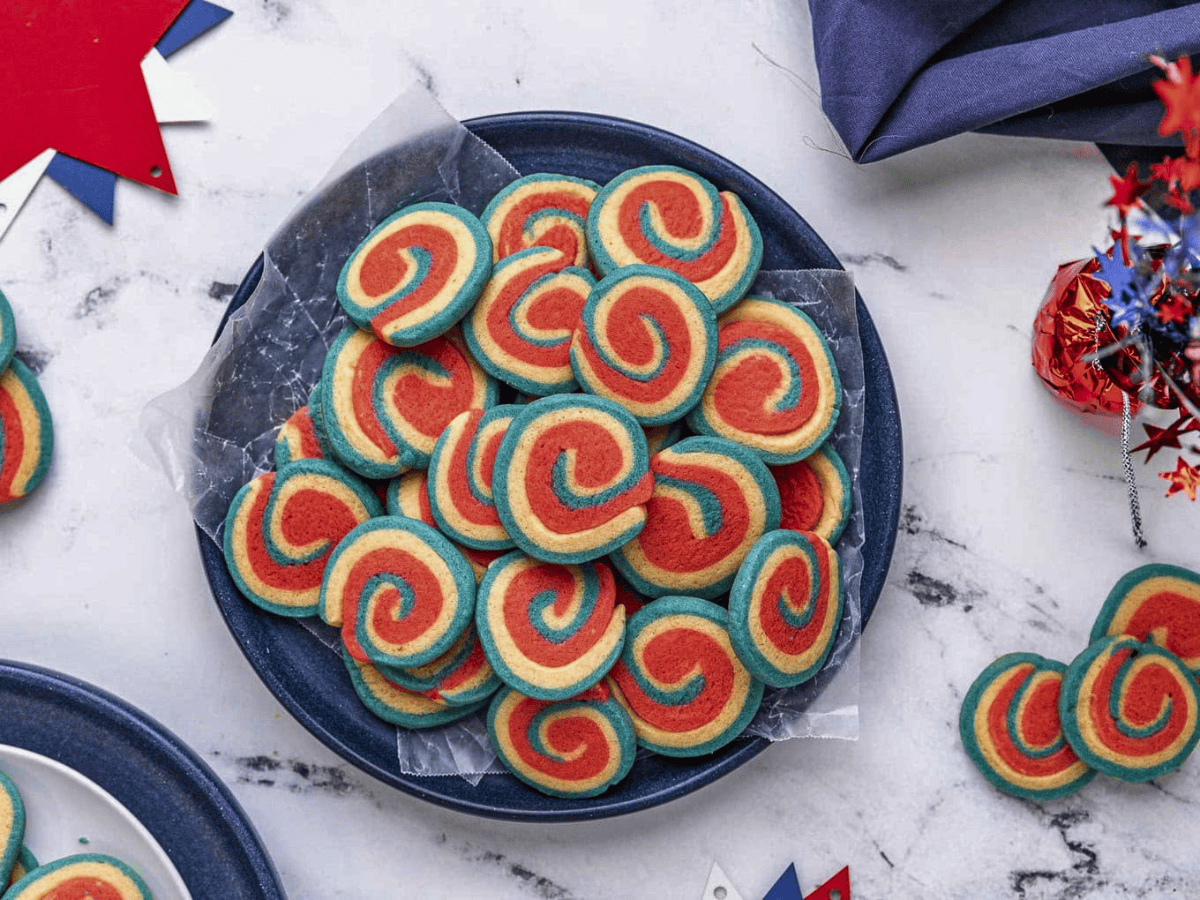

Sabrina’s 4th of July Pinwheel Cookies Recipe
One of the best things about these classic pinwheel cookies is they are easy to modify for any occasion. Simply change the color of dough to go with your event. Whether you need St. Patrick’s Day, birthday, or Christmas Pinwheel Cookies, all you have to do is change the food coloring to make the colors of dough you like.
Recipe Card

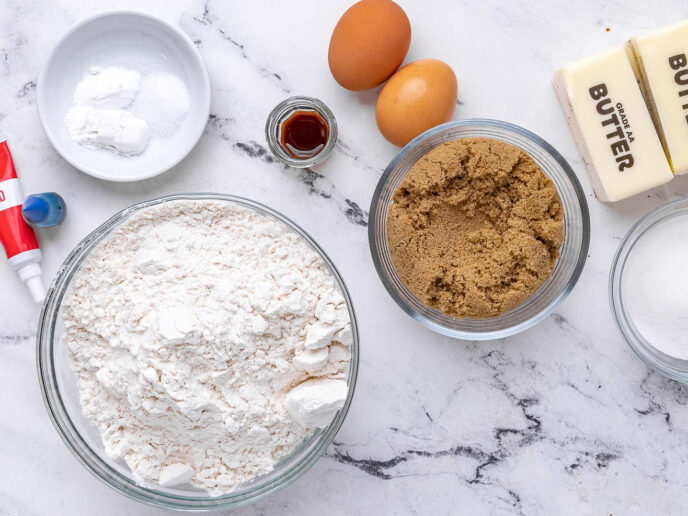
Ingredients
- 1 cup unsalted butter , softened
- 3/4 cup brown sugar , packed
- 6 tablespoons sugar
- 2 large eggs
- 2 teaspoon vanilla extract
- 3 1/2 cups flour
- 1/2 teaspoon salt
- 1 teaspoon baking powder
- 1/2 teaspoon baking soda
- 1/2 teaspoon red gel food coloring
- 1/2 teaspoon blue gel food coloring
Instructions
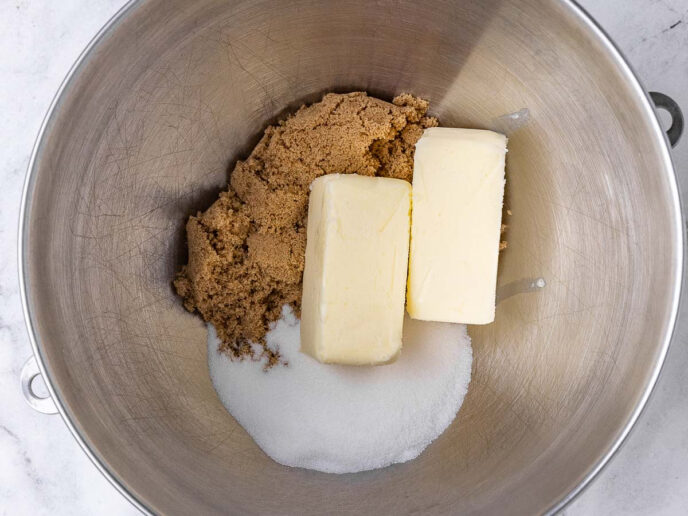
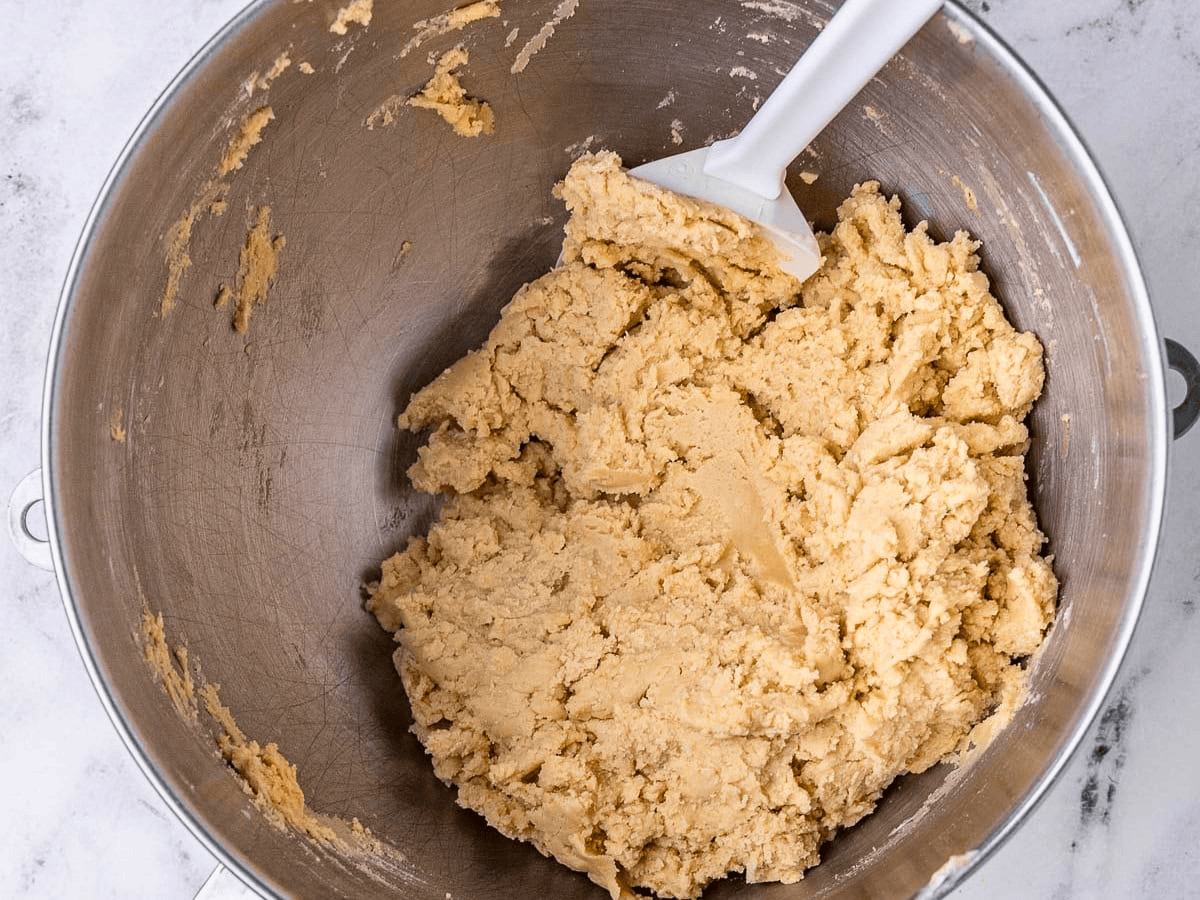
- Add the butter, brown sugar, and sugar to a stand mixer on medium-high speed and cream until light and fluffy, about 2-3 minutes.
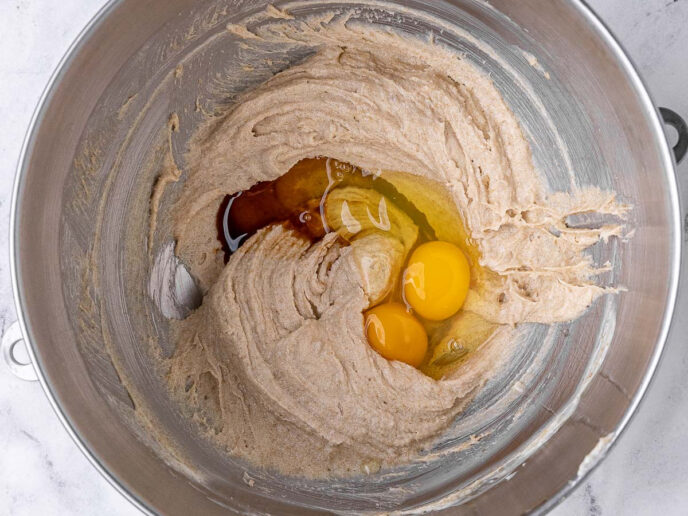
- Add in the egg and vanilla extract until well combined.
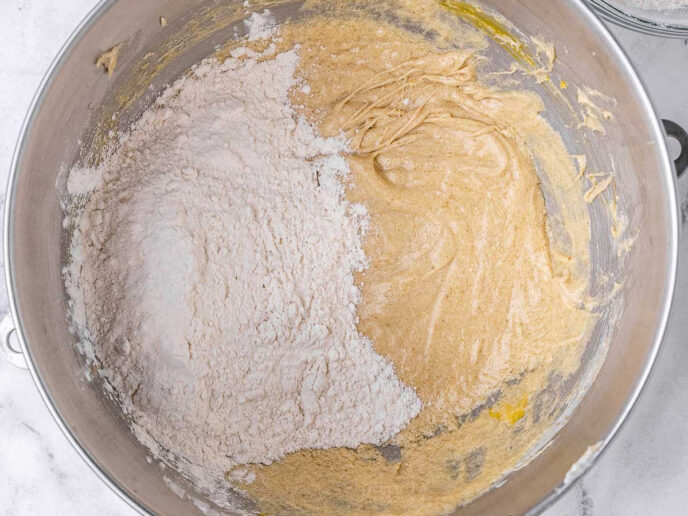
- In a large bowl sift together the flour, salt, baking powder, and baking soda.
- Add the flour mixture to your stand mixer on low speed in small batches until just combined.
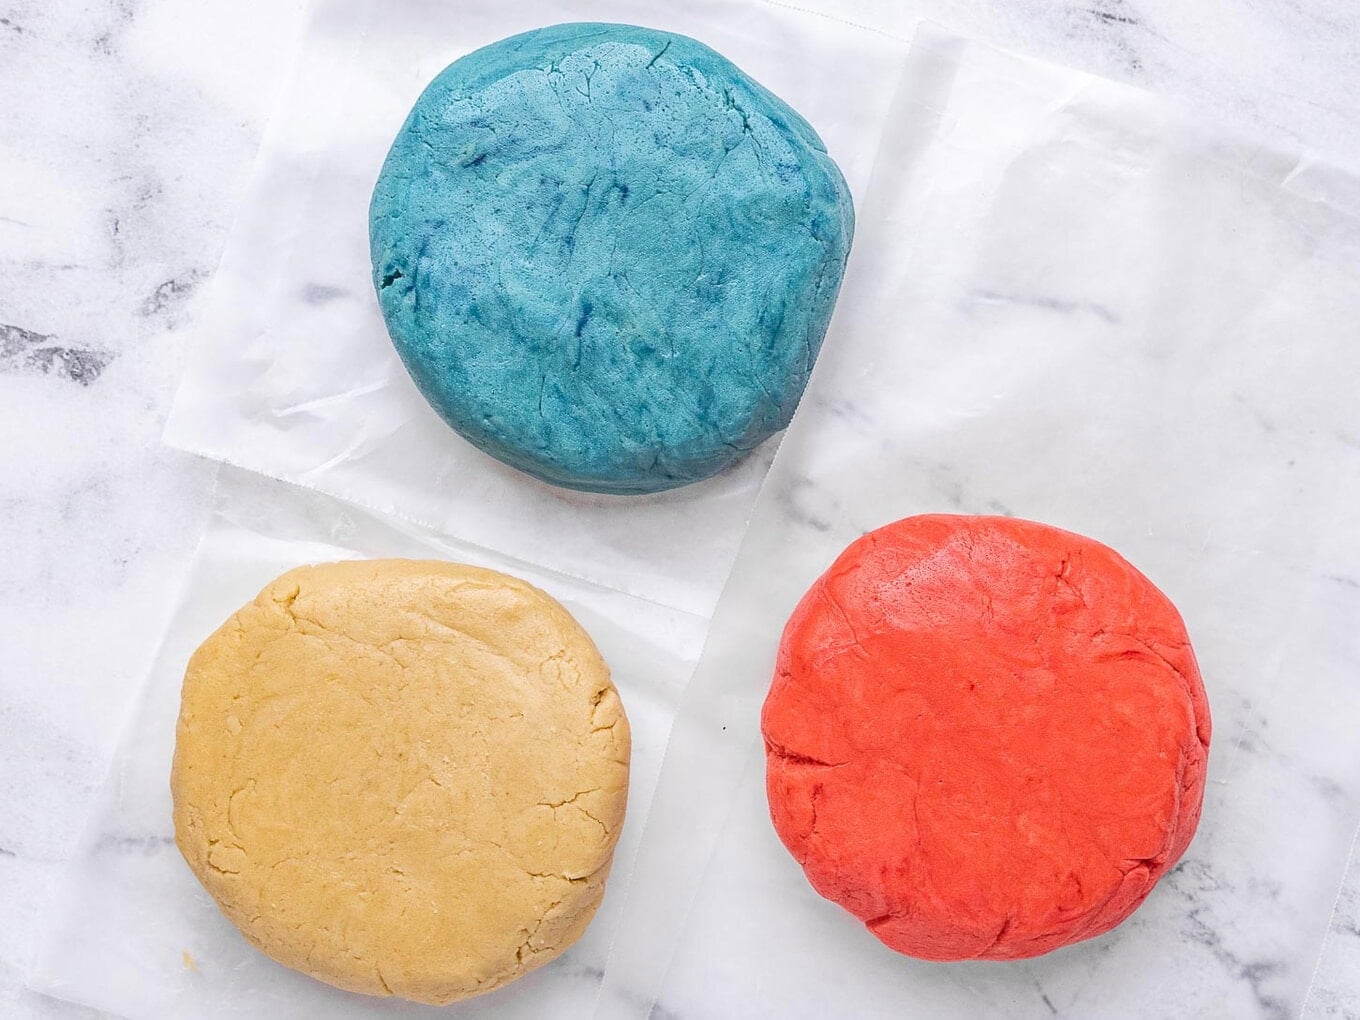
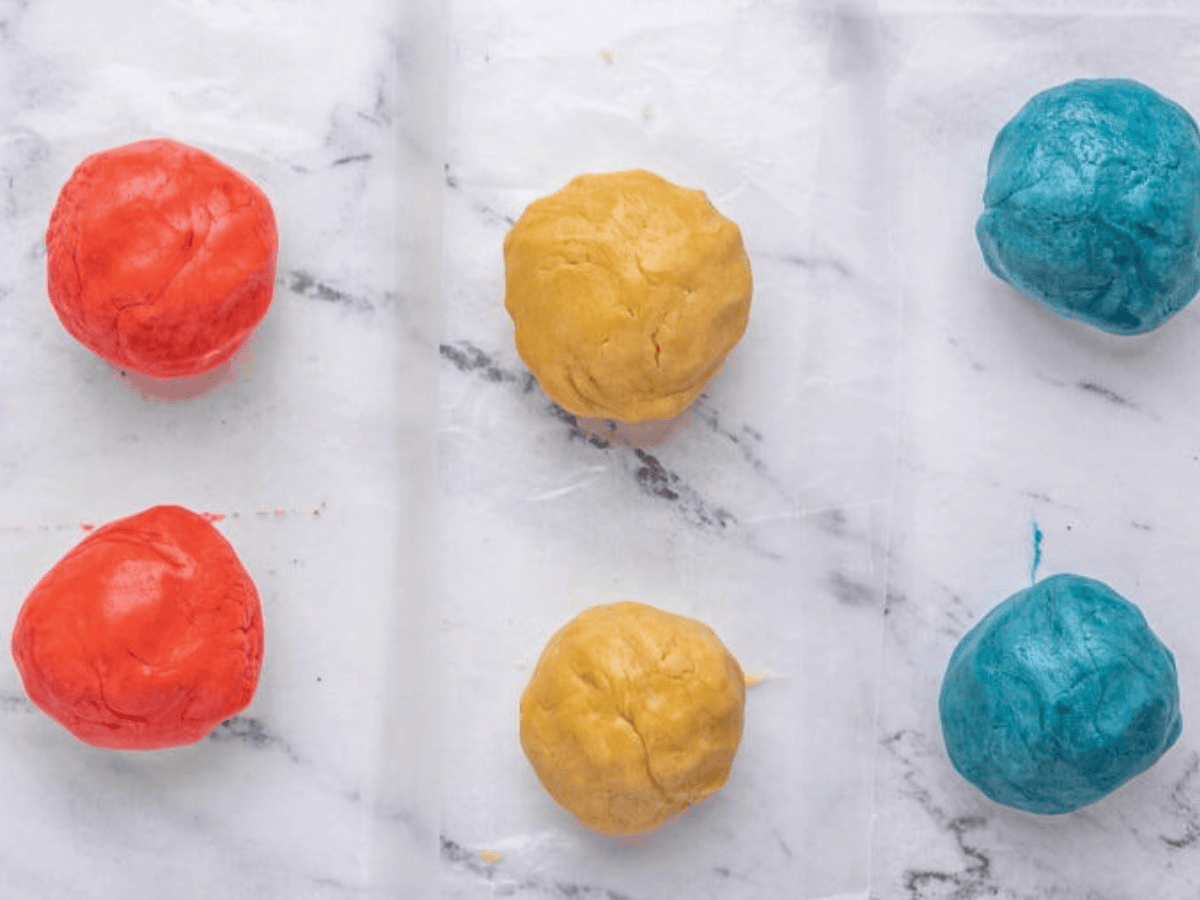
- Separate the dough into three equal pieces.
- Add food coloring to two of the bowls and mix until smooth and evenly colored.
- Wrap the dough pieces in plastic wrap and refrigerate for 20 minutes.
- Cut each piece of dough into two even pieces.
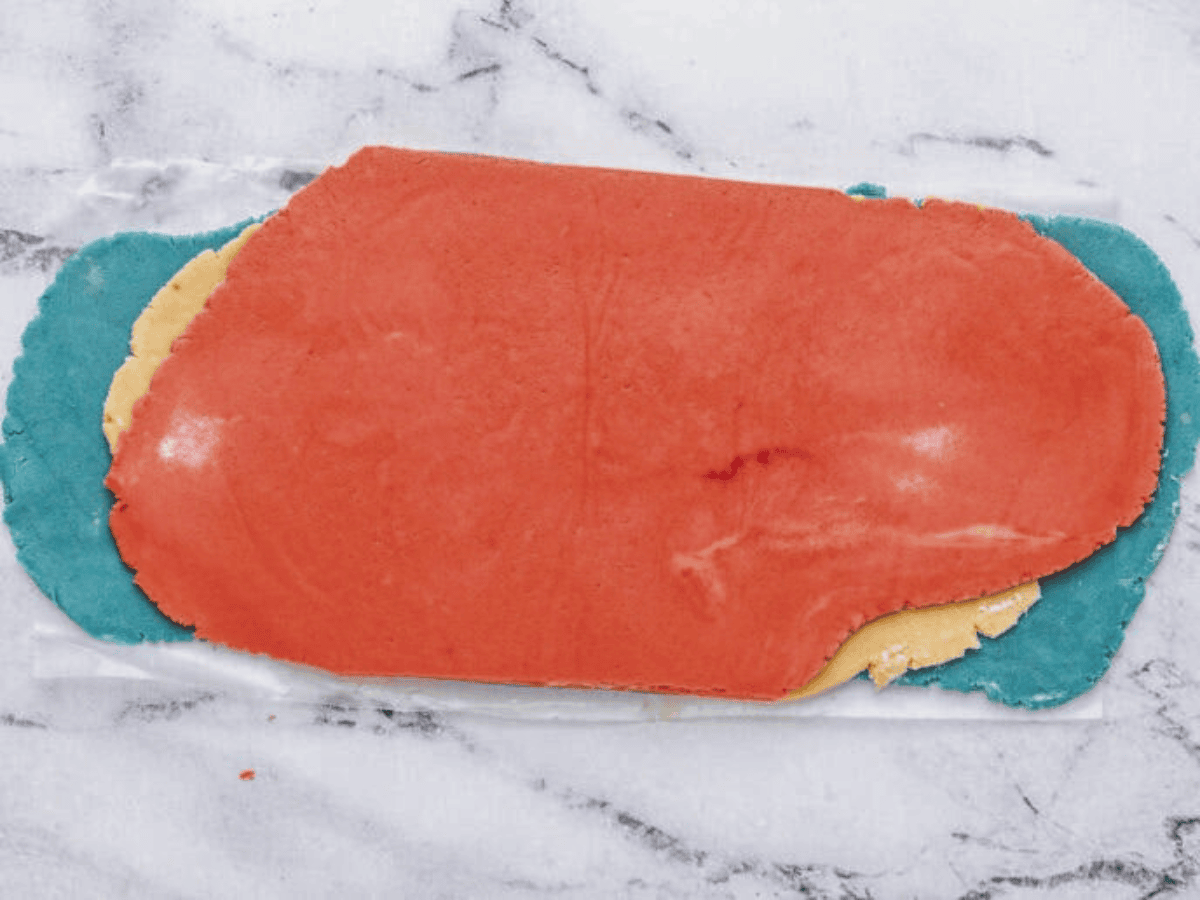
- Roll the six balls of dough into 10×6-inch rectangles.
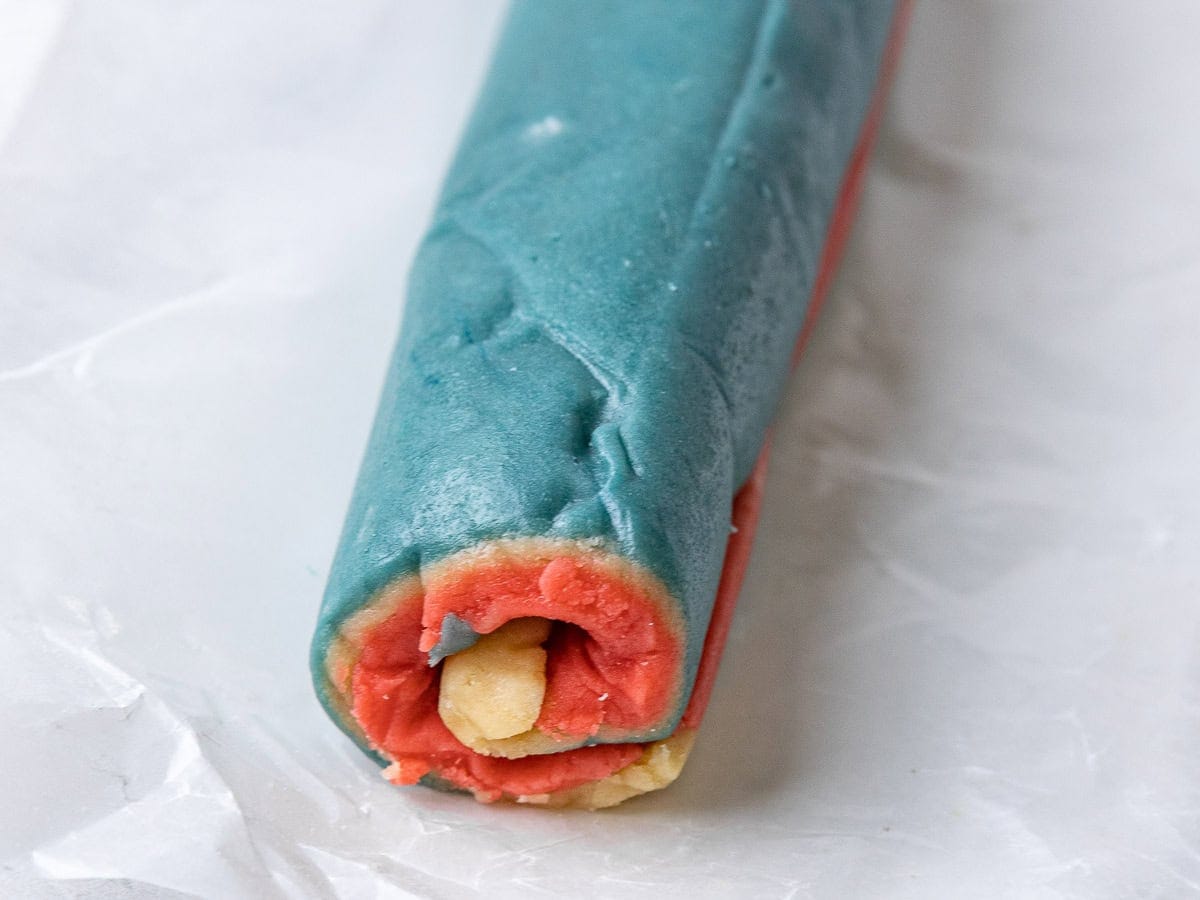
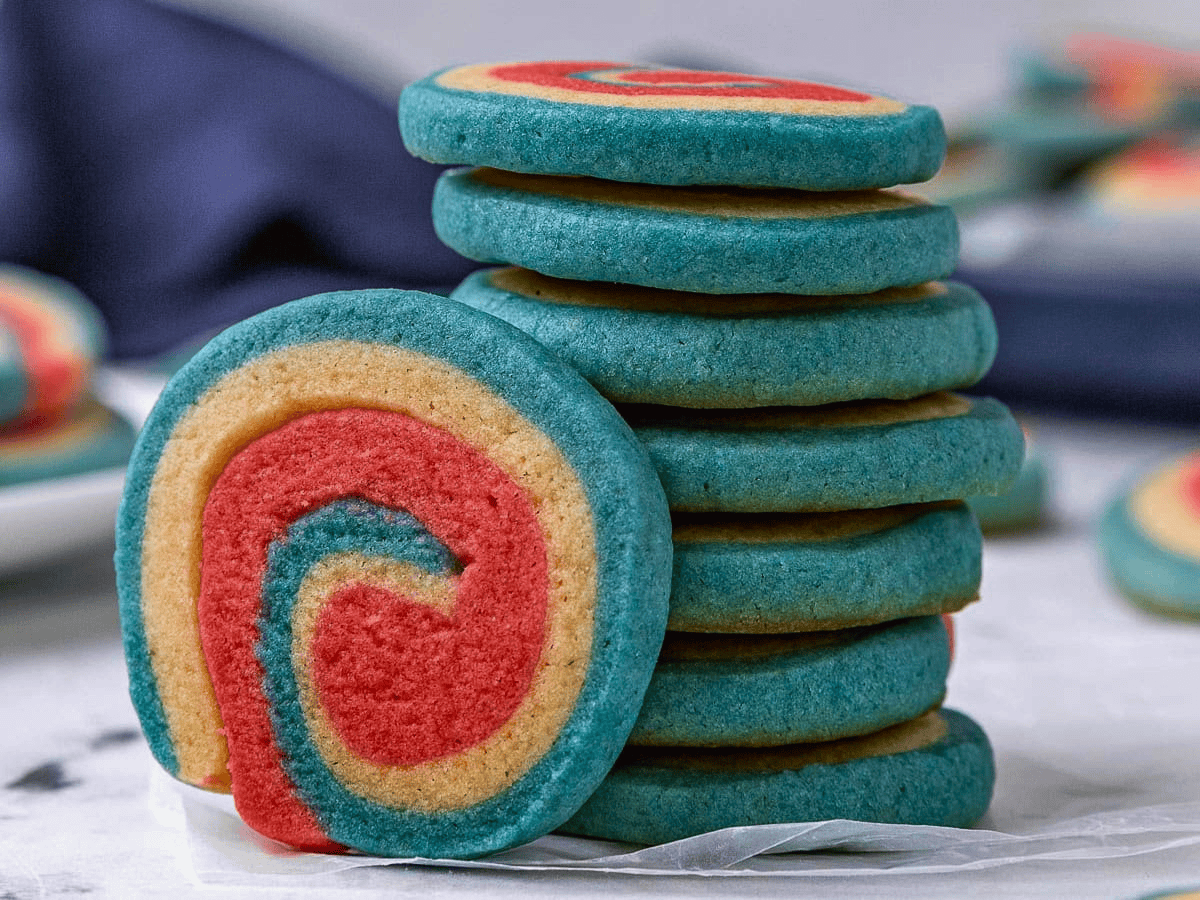
- Layer the white dough rectangles on top of the blue dough rectangles, and then the red dough rectangles on top of the white dough rectangles so that all 3 are stacked.
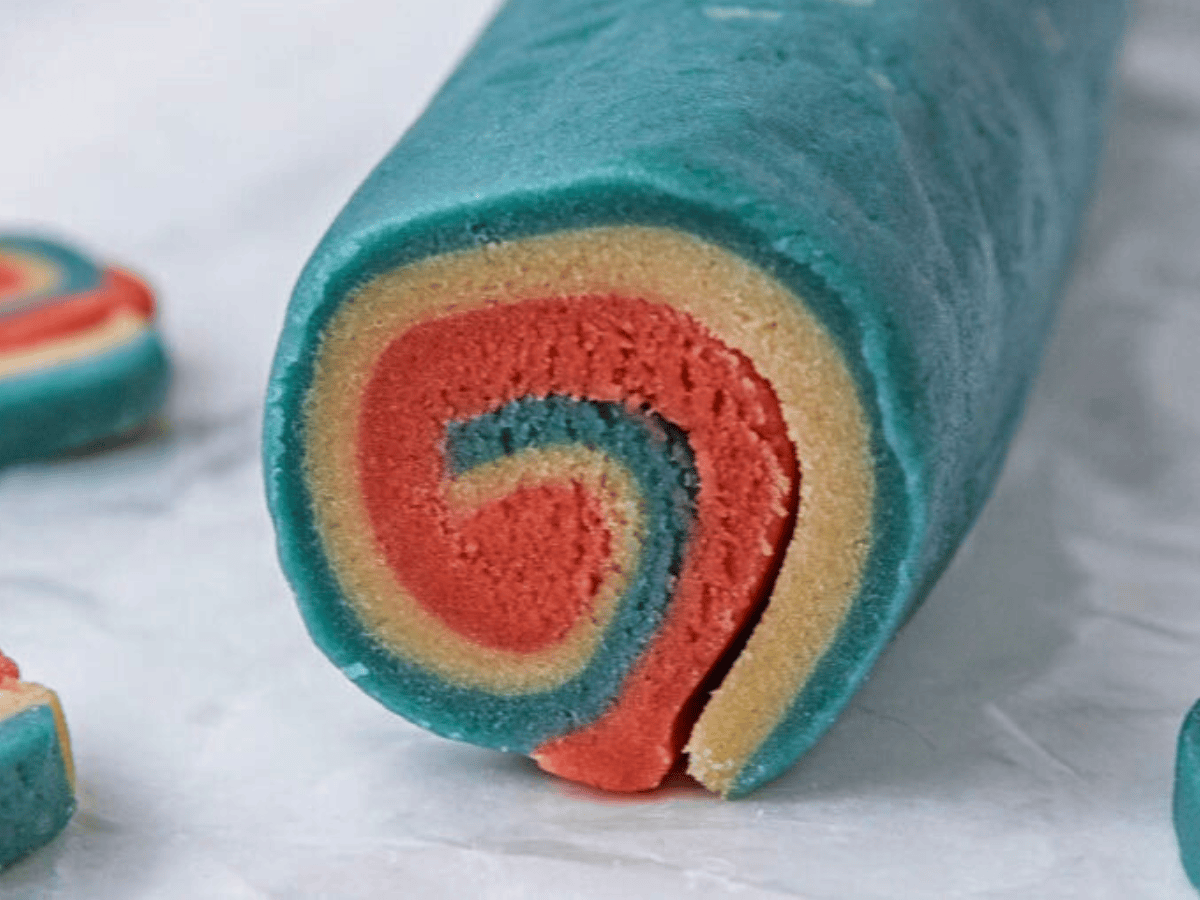
- Roll the dough into two logs (roll so the cookie log is long and skinny, rolling up from the widest side), wrap tightly with saran wrap and refrigerate for 1-2 hours.
- Preheat the oven to 375 degrees.
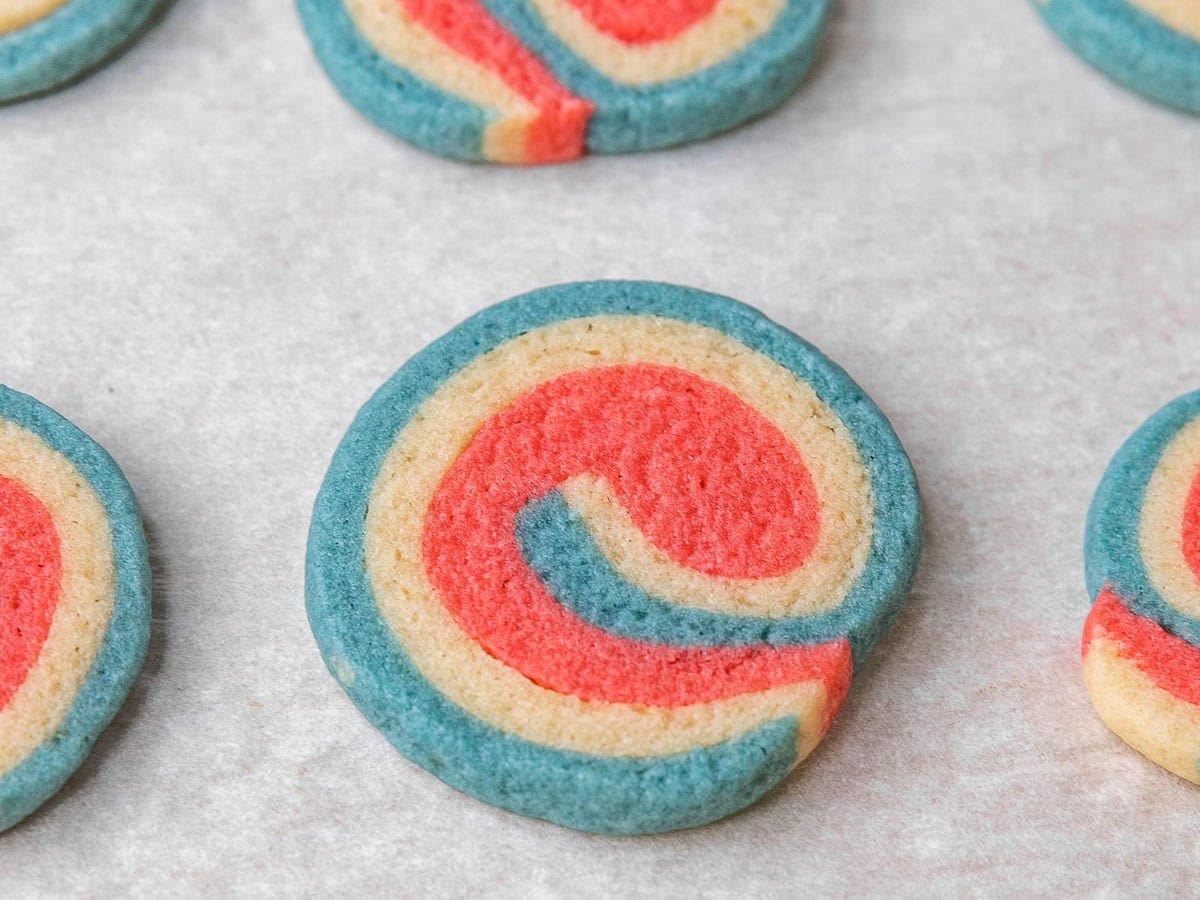
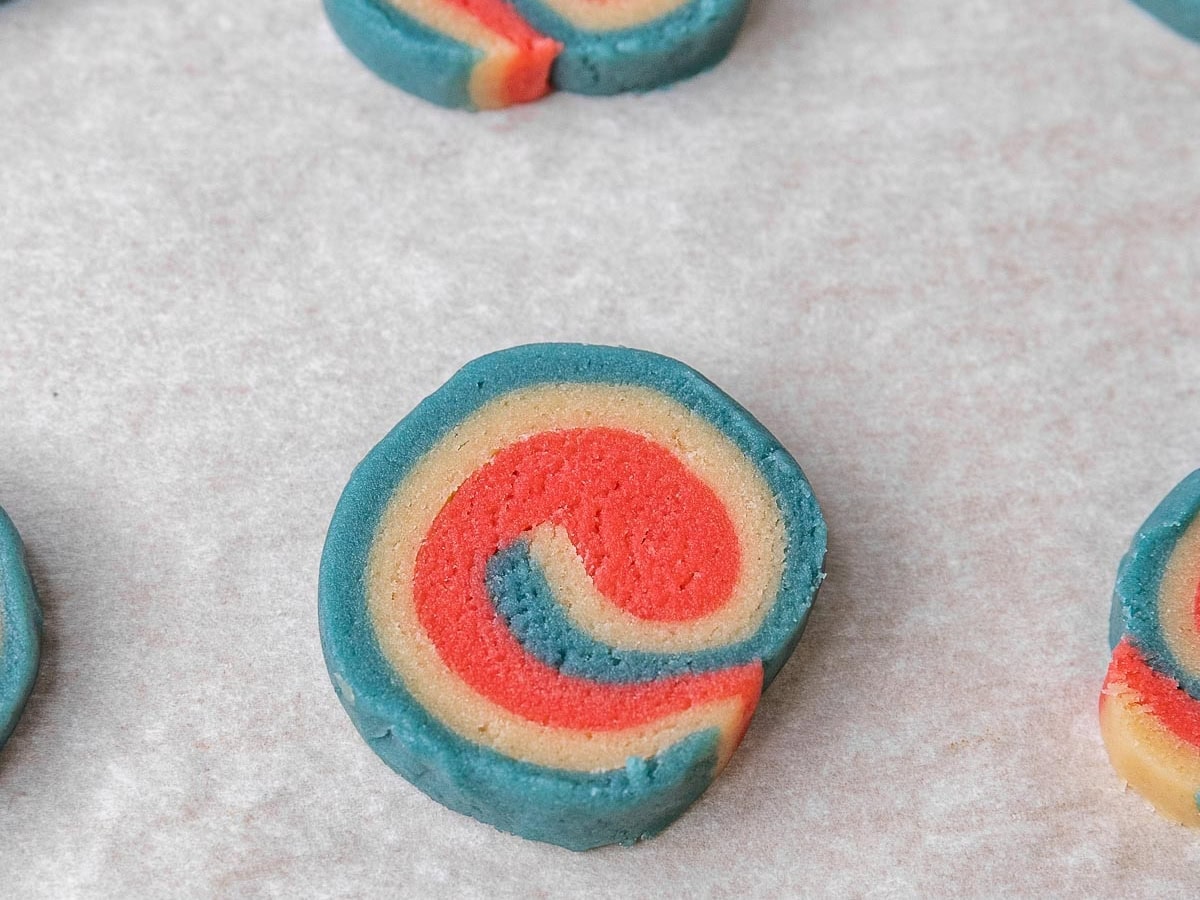
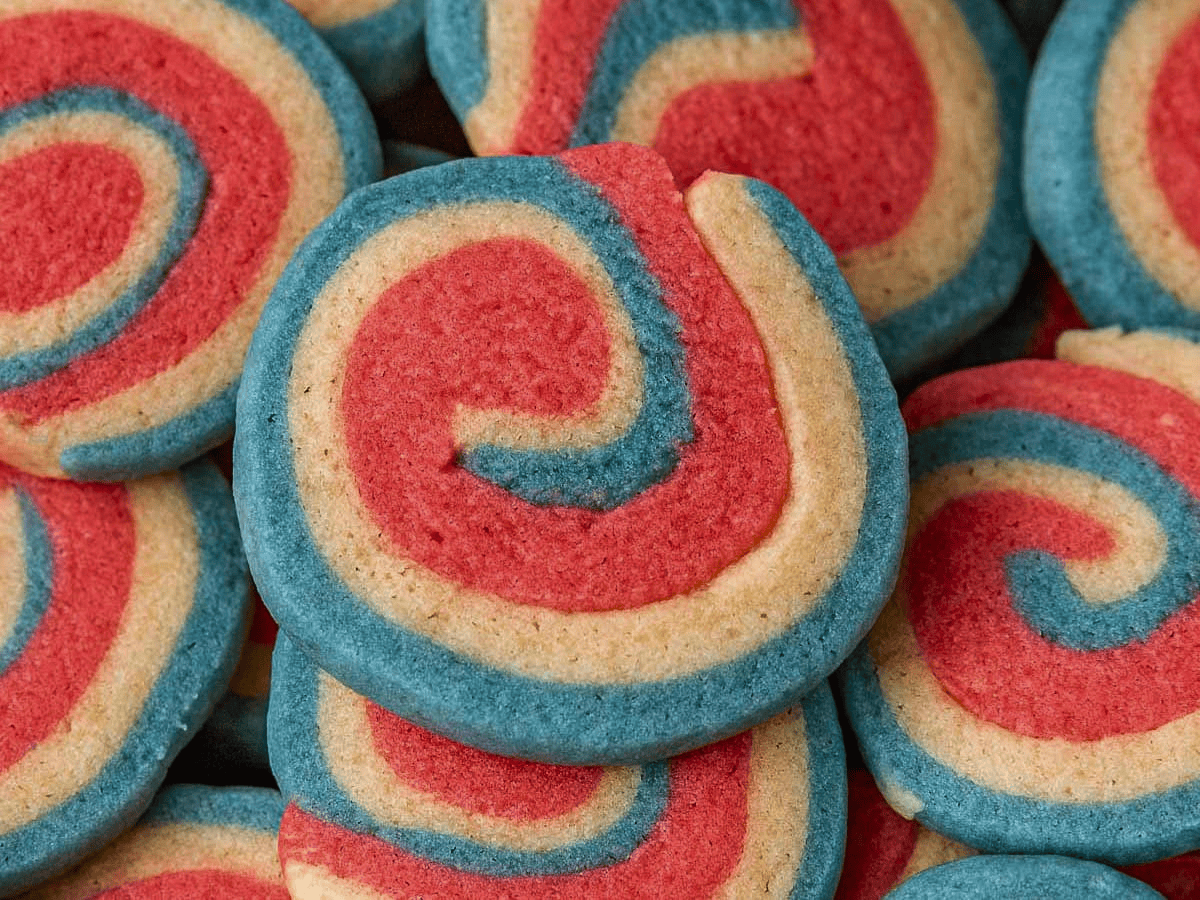
- Slice the cookies 1/4-inch thick and place on a parchment paper-lined baking sheet.
- Bake for 8-10 minutes, but do not let them brown.
Nutrition
Want to save this recipe? Create a free account to easily save your favorite recipes
Sabrina’s Tips
Achieve the perfect spiral cookies by following these handy tips: u003cbru003e1.u003cstrongu003e Make Cutting Cookies a Breezeu003c/strongu003e: Be sure to fully refrigerate or even freeze your rolls of cookie dough so that slicing them will be a breeze and they will keep their round spiral shape.u003cbru003e2. u003cstrongu003eWrap a Tight Spiralu003c/strongu003e: Make sure the spiral you wrap is nice and tight so it will stay together when you roll and slice it. You also don’t want to have too much flour on the dough rectangles, otherwise they won’t stick together. If you used too much flour when you rolled them out, brush some off the dough before stacking and rolling.
Table of contents
About this Recipe
These Patriotic Pinwheel Cookies are sure to liven up your dessert table with their bright colors and fun spiral pattern. Best of all, you can make the fun cookies with basic pantry ingredients like brown sugar, vanilla, butter, and flour. The classic vanilla cookie flavor is similar to my simple Sugar Cookie Recipe, which is buttery and sweet with a hint of vanilla that’s delicious and familiar.
Ingredients
- 1 Cup Unsalted Butter: Use unsalted butter as the fat ingredient in this cookie recipe. It’s important to let the butter soften before making the dough. That way, you can easily cream butter and sugar together. Using unsalted will allow you to control the amount of salt in the cookies.
- Sugar: To sweeten the cookies, use a combination of ¾ cup brown sugar and 6 tablespoons white sugar. Using brown sugar creates richer, chewy cookies. Meanwhile, the lighter granulated sugar, allows more air into the recipe so that the cookies aren’t too dense.
- 2 Large Eggs: In a cookie recipe, the eggs will allow the cookie dough to rise to create a fluffy texture in your finished cookies. They also help bind the cookie dough and keep that cookie shape while baking.
- 2 Teaspoons Vanilla Extract: Vanilla provides most of the flavor in your cookies. You can use any vanilla extract you like, but pure vanilla extract will have a better flavor. After trying a few different brands with your baking, you might find you have a favorite of your own!
- 3 ½ Cups Flour: Regular all-purpose flour works perfectly for this cookie recipe. Sift the dry ingredients before adding them to the cookie dough. That way, you don’t have to overmix to remove lumps from the flour mixture.
- ½ Teaspoon Salt: The salt will not only balance but it will also enhance the sweet flavors of the sugars and vanilla. Use regular table salt for baking.
- Leavening Agents: 1 teaspoon baking powder and ½ teaspoon baking soda work hand in hand to help the recipe rise while you’re baking cookies. The leavening agents make the cookies more light and airy and keep them from spreading out too much.
- Gel Food Coloring: To color the Pinwheel Cookie dough, use red food coloring for one portion and blue for the second portion, leave a white portion with no food coloring. Both gel food colors are quite strong, so you should only use one drop at a time to get the wonderfully vibrant color you want.
Kitchen Tools & Equipment
- Stand Mixer with Paddle Attachment: Your trusty stand mixer will make easy work of combining the ingredients for your cookies. If you don’t have one, you can always use a handheld electric mixer, or a large mixing bowl and a whisk.
- Sifter: A sifter will blend your dry ingredients together so that you don’t have to mix the dough too much, and risk over-mixing. If you don’t have a sifter you can use a mesh strainer and it will do the job nicely.
- 3 Large Mixing Bowls: You’ll need 2 bowls to mix red food coloring into ⅓ of the dough, and blue food coloring into another ⅓ of the dough, and 1 bowl to hold your dough with no color.
- Rolling Pin: A rolling pin is necessary to roll out each of your 3 colors of dough: red, white, and blue. You’ll stack the rolled out rectangles in order to roll them up into a log and cut into pinwheel slices.
- Plastic Wrap: After your dough is rolled out, colors are stacked, and then rolled up into a log. You’ll need to refrigerate the log so it firms up before cutting your cookies. Wrap the logs in plastic wrap or saran wrap so they don’t dry out.
- Cookie Sheet: A standard baking sheet or cookie sheet is perfect for baking your pinwheel cookies.
- Parchment Paper: Line your baking sheet with parchment paper so the cookies won’t stick to the pan. This prevents the need for baking spray on your pan.
- Sharp Knife: You’ll use a sharp knife to cut the cookie dough log into cookies about 1/4-inch thick.
Can this be made ahead of time?
Yes. You can bake the cookies in advance to store at room temperature, in the fridge or the freezer until you’re ready to serve. Alternatively, make the cookie dough in advance and wait to bake until the day of. You can mix the dough and roll it out to form the pinwheel logs up to 4 days ahead of time. Keep the dough wrapped in the fridge, then just slice it into circles and bake the day-of.
Serving Ideas
Set out a platter of red, white, and blue Pinwheel Cookies during your family barbecue, your neighborhood potluck, or any 4th of July party. They’re also such an easy treat to take on the go to a park for a picnic, or to a friends house. Enjoy your cookies with a glass of cold milk. Bring in extra flavor and some nostalgia by washing the cookies down with Homemade Chocolate Milk or an old-fashioned Strawberry Milkshakes.
How to Store
- Serve: Let the sugar cookies cool for a few minutes on the cookie sheet before transferring them to a wire rack. You can keep pinwheel cookies at room temperature for up to 2 weeks. To keep them from drying out, wait for the cookies to cool, then cover them in plastic wrap or put them in an airtight container.
- Store: You could also place the cookies in an airtight container to store in the fridge for up to 2 months.
- Freeze: To freeze the cookie recipe, put them in a freezer bag with parchment paper or wax paper between the layers so that they don’t freeze together. Kept carefully sealed, the homemade cookies can be kept frozen for up to 8 months.
Frequent Questions
This recipe bakes in just 8-10 minutes. It’s important to keep an eye on the pinwheel cookies in the last few minutes of baking time. That way, you can take them out before they start to brown. Before browning, the cookies have a buttery and chewy texture. Browning will also make the red, white, and blue colors less vibrant.
Classic Pinwheel Cookies became increasingly popular throughout the 1930s.
This is likely because the dough was too warm. While it may be tempting to save time by skipping the refrigerating, chilling the dough allows the butter to re-solidify so that the dough doesn’t spread too much in the baking time.
Variations
- Valentine’s Pinwheels: Instead of the blue dough, you could make a bowl of white dough, red dough, and pink dough for the perfect pink, red, and white Valentine’s cookies.
- Flavor Extracts: For additional flavor in the sugar cookie base, try adding a small amount of almond extract, coconut extract, raspberry extract, or any flavor you like.
- Sprinkles: If you want to add another layer of decoration to this red, white, and blue cookie recipe, you can add sprinkles around the outside of the cookies. Before you wrap the dough log, roll it in red, white, and blue sprinkles to coat the outside. Then, wrap it in a layer of wax paper instead of plastic wrap so the sprinkles won’t stick, and let the dough chill before baking.
Related Recipes
More 4th of July Treats
Photos used in previous version of post: